Securing EC2 Instances within AWS Virtual Private Cloud (VPC)

INTRODUCTION
As a cloud security engineer, you are responsible for securing your company's cloud infrastructure. One of your tasks is to create instances within a VPC, with a public subnet for internet-exposed instances and a private subnet for isolating instances from the internet.
The security features in Amazon VPC include security groups, routing tables, external gateways, and network ACLs.
Disclaimer
The AWS Management Console is subject to updates and changes over time. The information provided in this lab write-up is based on the console’s state at the time of writing and may not reflect the current user interface or functionality. It is recommended to refer to the official AWS documentation for the most up-to-date instructions when using the AWS Management Console.
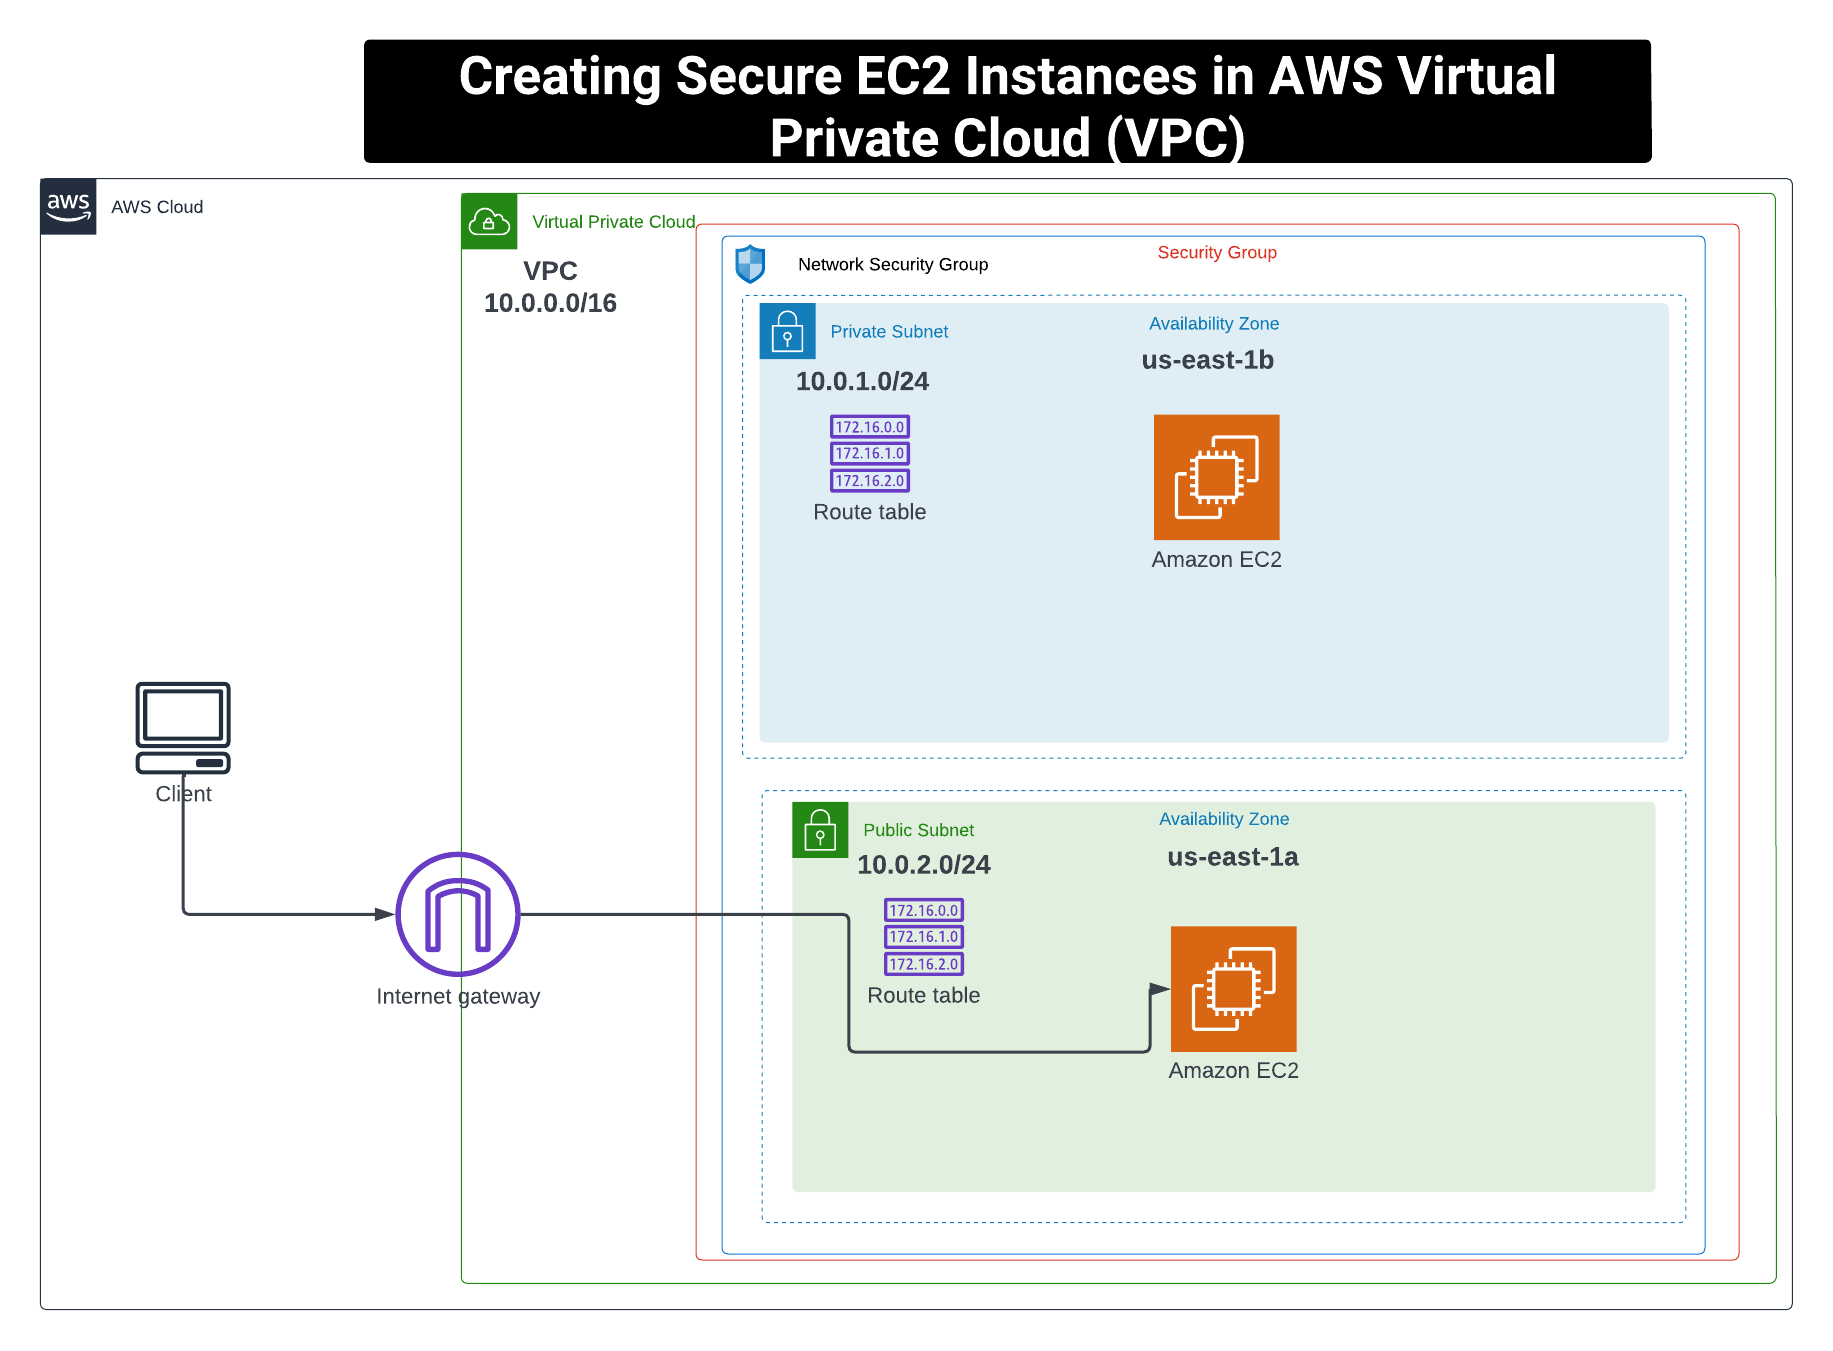
LAB OVERVIEW
This lab demonstrates the creation of a VPC with public and private subnets; instances in a private subnet cannot be addressed from the internet. By understanding and implementing the instructions in this lab, you will know how to secure EC2 instances within an AWS VPC.
NOTE: To avoid incurring future charges on your AWS account, delete the resources you created in this walkthrough.
Creating a VPC
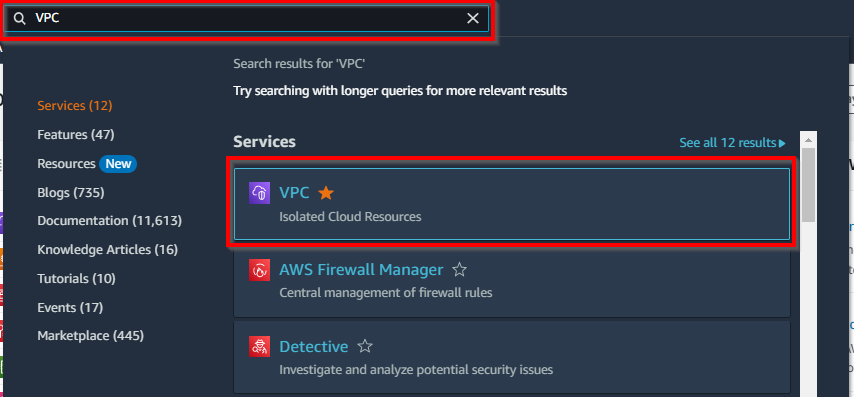
Login to your AWS FREE TIER account Search for VPC in the search box and click on VPC (Isolated Cloud Resources) from the dropdown search results.
In your VPC Dashboard, navigate to “Your VPCs” in the left pane under the Virtual Private Cloud. Then click on “Create VPC”.

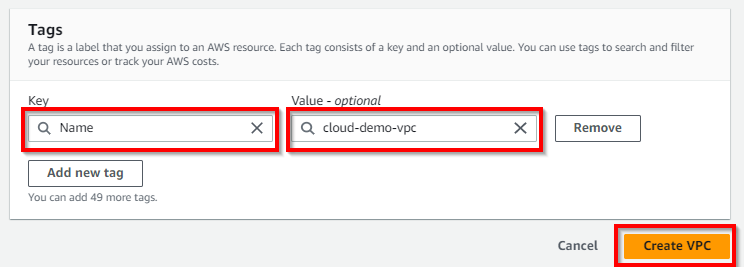
In the Create VPC View, under VPC Settings, click the radio button “VPC ONLY”, then enter a name tag (e.g. cloud-demo-vpc). Then, for the IPv4 CIDR block, enter the VPC IP address in the form of the CIDR block. {10.0.0.0/16}.
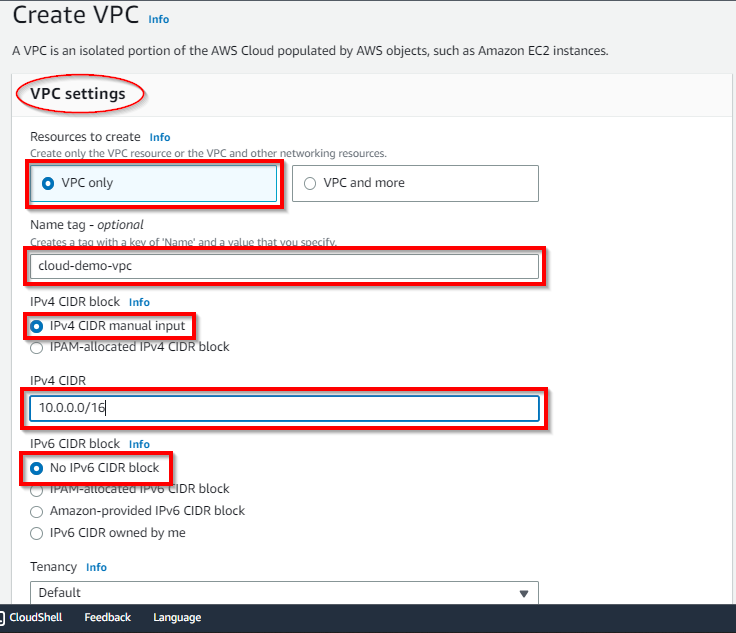
Retain the other default settings as they are, then scroll down to the bottom and click on Create VPC.
Now we have successfully created a VPC.
Note: Copy the VPC ID for future reference in this lab.

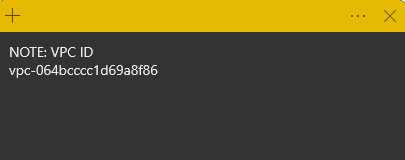
VPC ID noted on Sticky Note
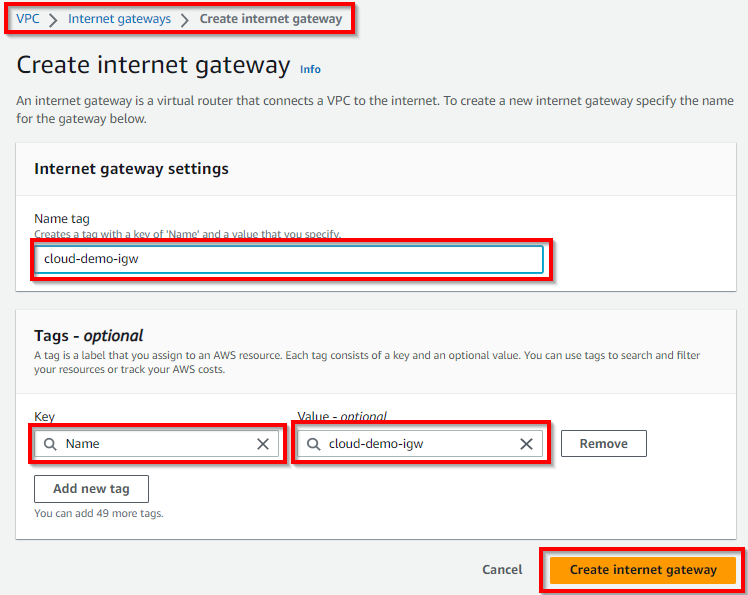
Now, you need to create an internet gateway to connect the instances in the VPC to the internet. Therefore, click on Internet Gateways on the left pane under "Virtual Private Cloud. Then click “Create Internet Gateway”

In the Create Internet Gateway view, enter a name tag (cloud-demo-igw) for the Internet gateway. For tags, retain the default setting (optional) and click on Create internet gateway.
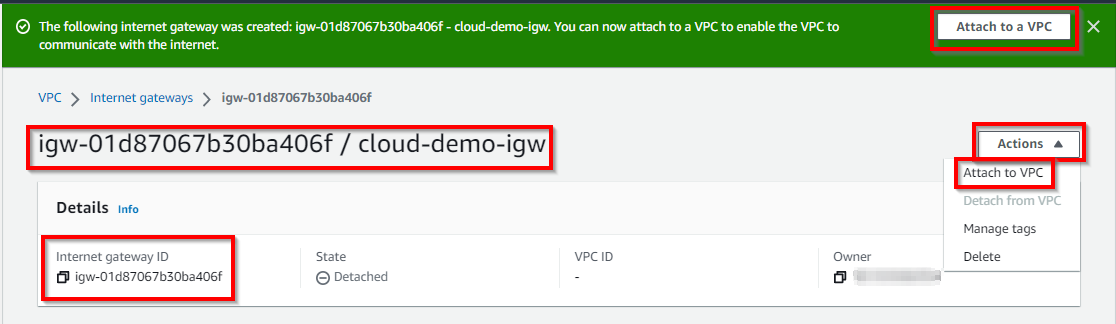
Hence, the internet gateway is successfully created. Now, to allow internet access to the VPC, attach the internet gateway to the VPC. Click on Attach to a VPC in the message displayed on the top. or Actions, then click on Attach to a VPC
In the Attach to VPC view, select the created VPC (cloud-demo-vpc) under Available VPCs. Click on Attach Internet gateway.
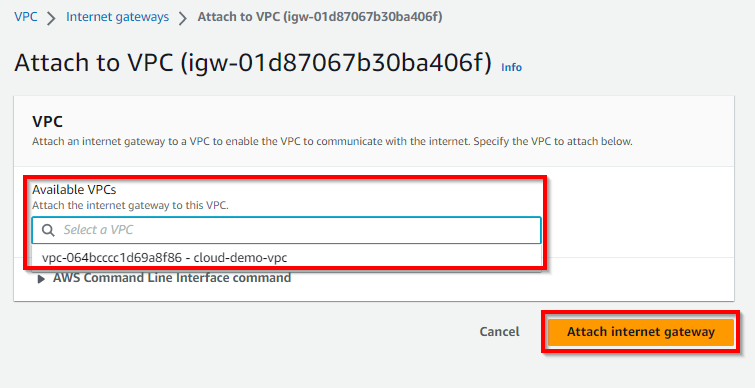
Note: In some cases, you will have multiple VPCs under Available VPCs if you have any already created VPCs. Ensure that you select the VPC that you created for the purpose of this lab.
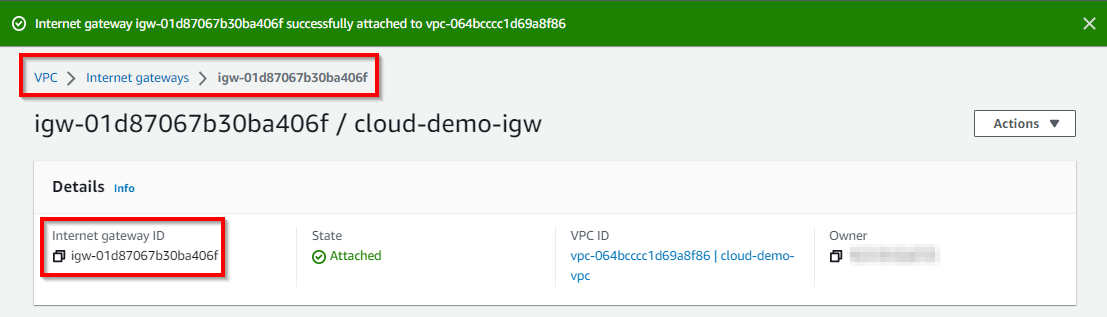
Now Internet gateway is successfully attached to VPC for internet-access.
Creating a public and private subnet in the VPC
NOTE: Public subnets are created for connectivity to the internet which is where less sensitive data are stored while Private subnets are isolated from the internet which is where sensitive data are stored and are protected from internet-facing attacks such as DDOS etc. We First create the Private Subnet before creating the Public Subnet
Creating private subnet (10.0.1.0/24)
On the left pane of your VPC console, navigate and click on Subnets below "Virtual Private Cloud. Then click on Create subnet.

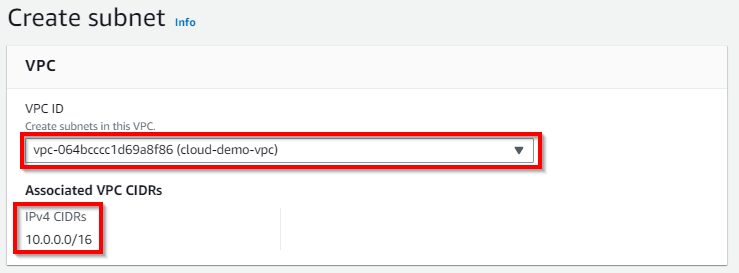
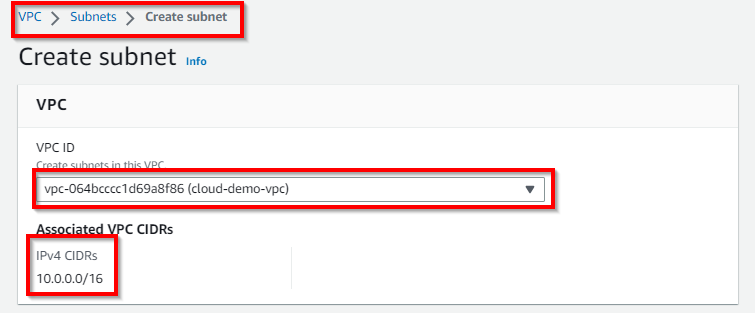
On the create subnet page, under VPC ID, click on the dropdown for Select a VPC. Select your VPC (cloud-demo-vpc).
NB: You might have multiple VPCs in the dropdown menu, so make sure you select the same VPC ID we copied in Notepad or Sticky Note.
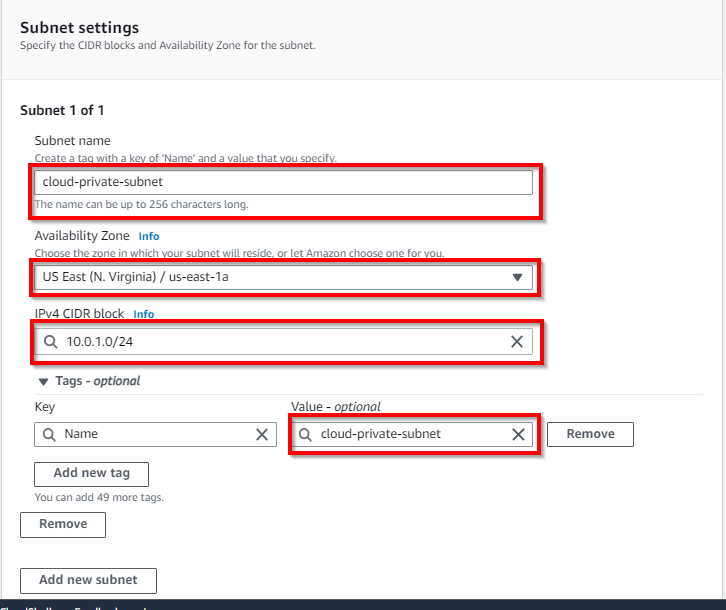
Next, under Subnet Settings, enter a subnet name for the private subnet (cloud-private-subnet). Enter the availability zone (us-east-1a) depending on your region. NB: You can select an AZ of your choice. Then, for the IPv4 CIDR block, enter the IP range (e.g. 10.0.1.0/24) for the subnet.
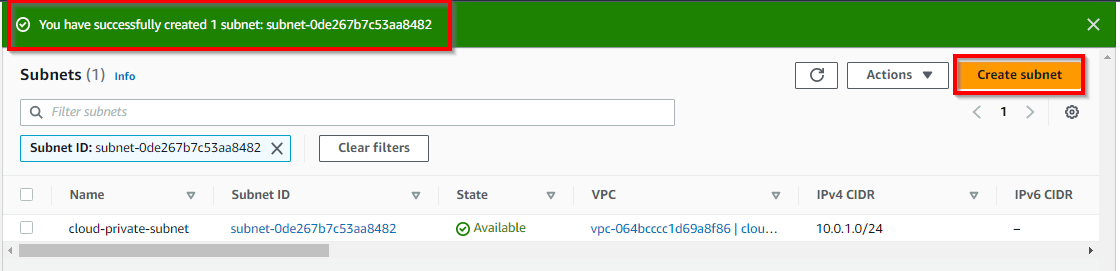
Once DONE, Click create subnet
Creating a public subnet (10.0.2.0/24)
Hence, we have created a private subnet. Now we create a public subnet in a different availability zone from the private subnet. On the same page as shown below, click on Create subnet.
NB: This process is similar to how we created a private subnet.
On the Create subnet page, select your VPC ID as saved in Notepad or sticky note. NB: You might have multiple VPCs in the dropdown menu so make sure you select the same VPC ID we copied in Notepad or Sticky Note.
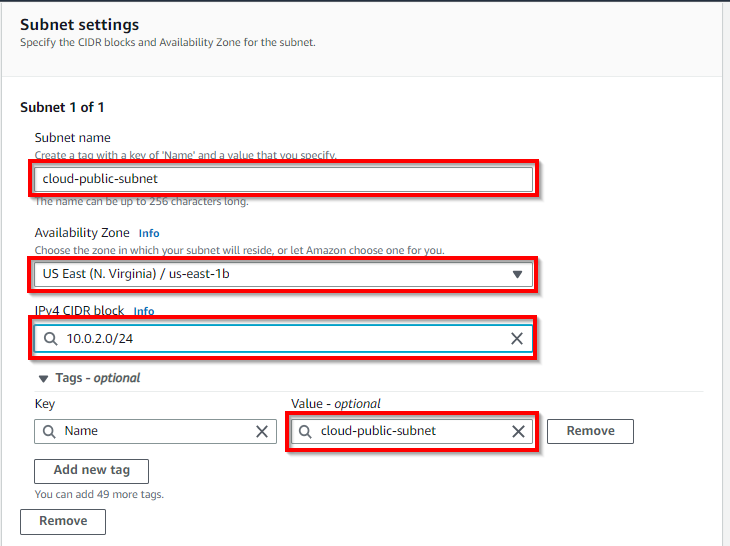
Next, Under Subnet Settings, Enter a Subnet name for the public subnet ( e.g. cloud-public-subnet). Enter the Availability Zone (us-east-1b) depending on your region. NB: You can select an AZ of your choice. Then for the IPv4 CIDR block, enter the IP range (e.g. 10.0.2.0/24) for the subnet.
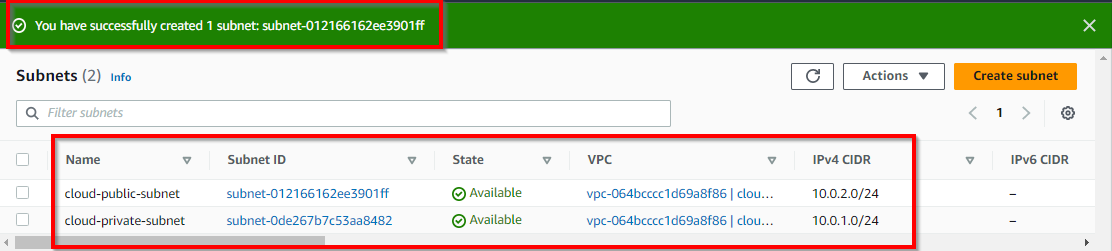
Once DONE, Click create subnet
Now we have both Public and Private subnets created in different AZ
Creating Route Table
Next, we need to create route tables to route the network traffic for private and public routing.
In your VPC dashboard, navigate and click on Route Tables in the left pane under "Virtual Private Cloud". Click on "Click route table"

You will notice that a default route table has been automatically created and attached to the VPC. This default route table is for private subnets. You have to create the ROUTE TABLE for PUBLIC SUBNET. To confirm this, scroll right and identify the VPC (cloud**-demo-vpc**) of the routing table. NB: the VPC ID must be the same as the one you copied to Notepad or Sticky Note.

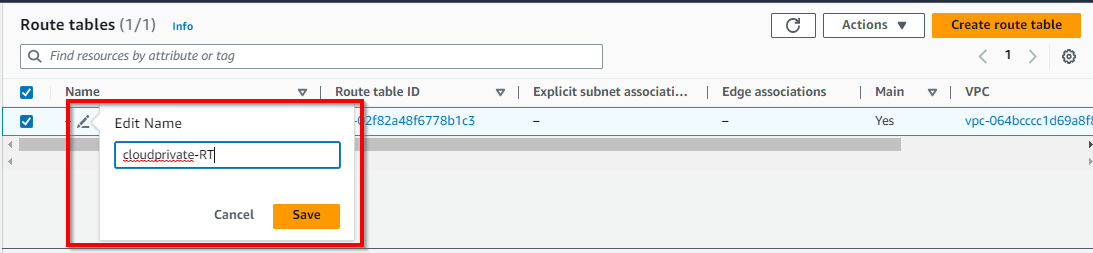
You can edit the tag name of the routing table of your VPC (cloud-demo-VPC) for easy identification (cloudprivate-RT). To do that, click on the edit icon under the name of the default route table. Enter a name (e.g. cloudprivate-RT) for the routing table for the private subnet. Click on Save.
Now, we create the route table for the public subnet, Click on Create route table at the top corner of your screen.
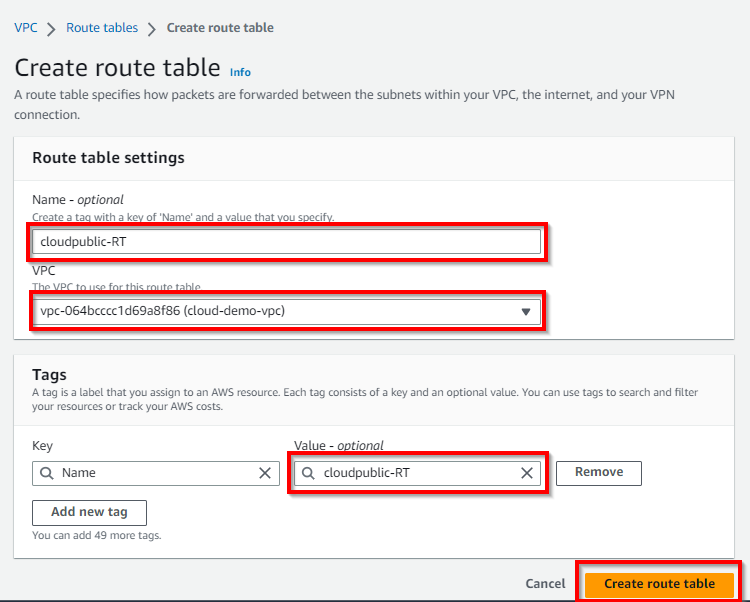
On the Create route table page, enter a name (e.g. cloudpublic-RT). Under VPC, select the VPC (cloud-demo-vpc) created by you from the dropdown.
Once DONE, Click on Create route-table
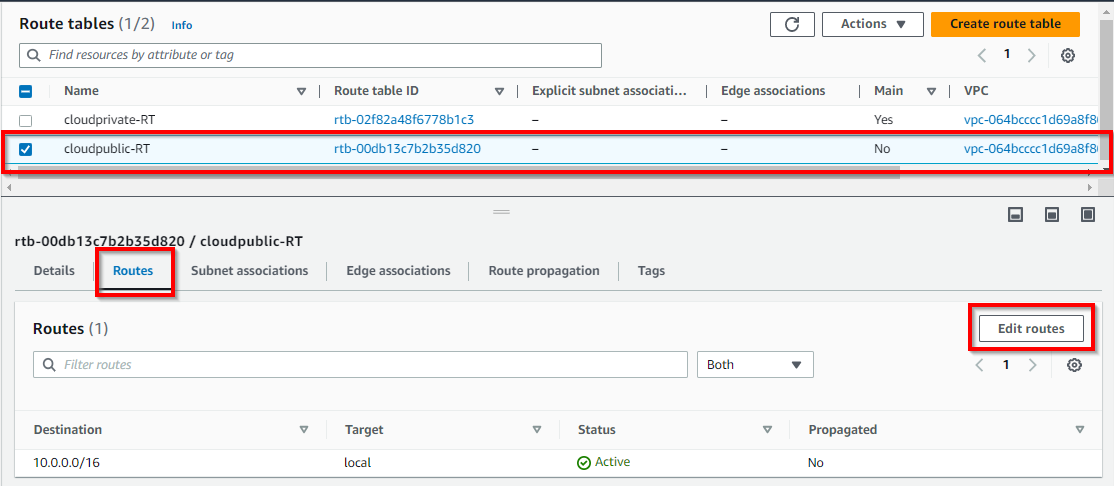
Hence, we have successfully created the routing table for the public subnet. Now, click on Route Tables (in the left pane) to view the route tables.

Configuring public route table
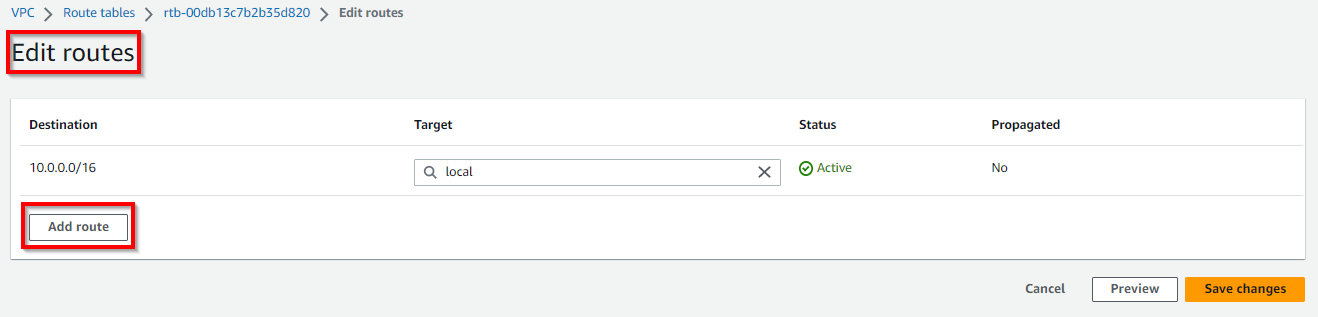
To configure the public route table, select the checkbox for the public route table (cloudpublic-RT) and click on the Routes tab at the bottom, then click on Edit route.
Summary: adding internet-gateway to public-subnet in route table
On the Edit route page, click on Add route. Under Destination, enter IP as 0.0.0.0/0 to allow traffic from any IP. And for Target, select Internet Gateway from the dropdown.
NB: Make sure the internet gateway ID or name (cloud-demo-igw) is the same as the internet gateway you created in the previous step.
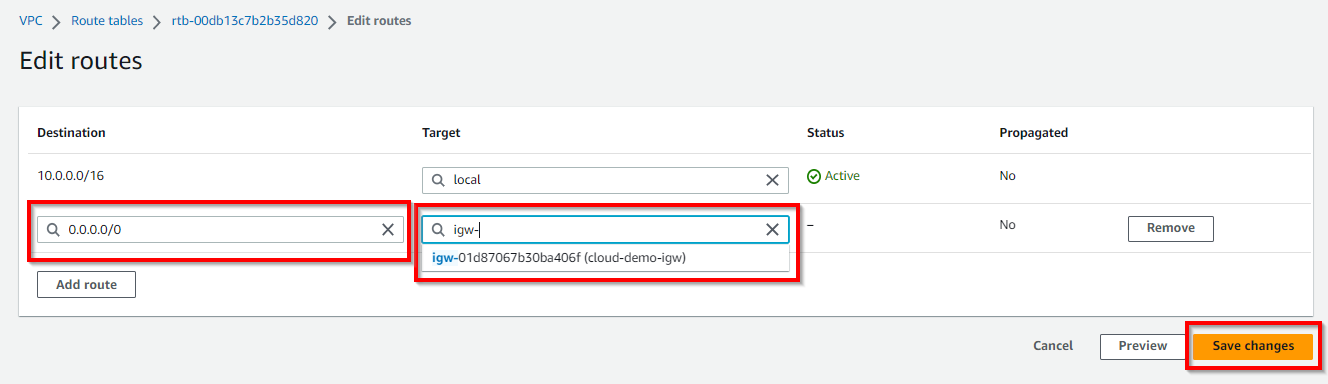
Once DONE, click on Save changes
Now the routes for the public subnet have been updated successfully.
Attaching the public subnet to the public route table
Click on Route Tables (in the left pane) to view the route tables. To attach a public subnet to the public route table, click on “cloudpublic-RT” then scroll to the bottom and click on the Subnet associations tab, then click on Edit subnet associations.

Select the checkbox for the public subnet (cloud-public-subnet) then click on Save associations.
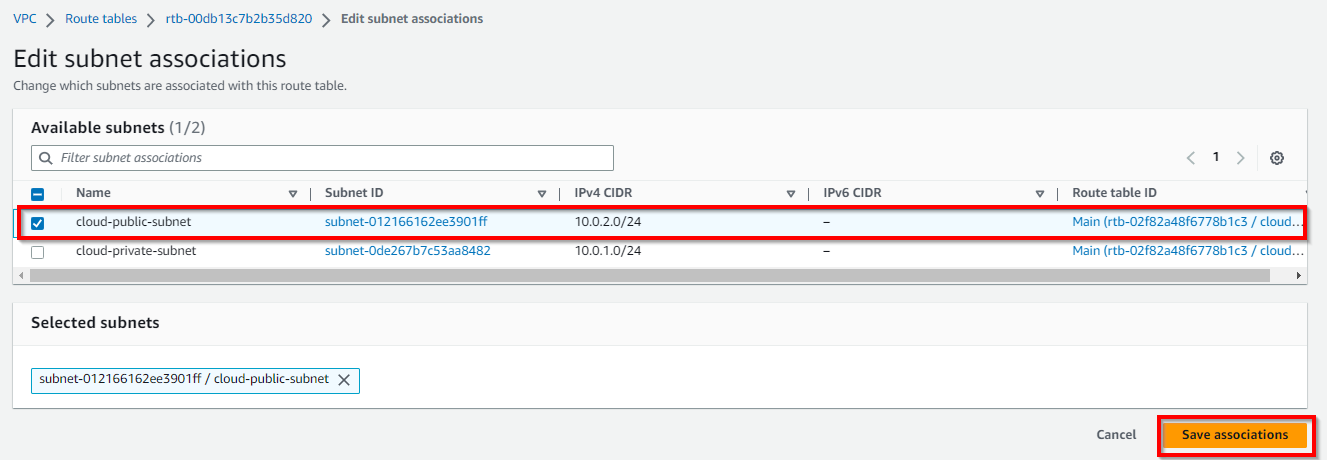
Thus, the public subnet has been successfully added to the public route.
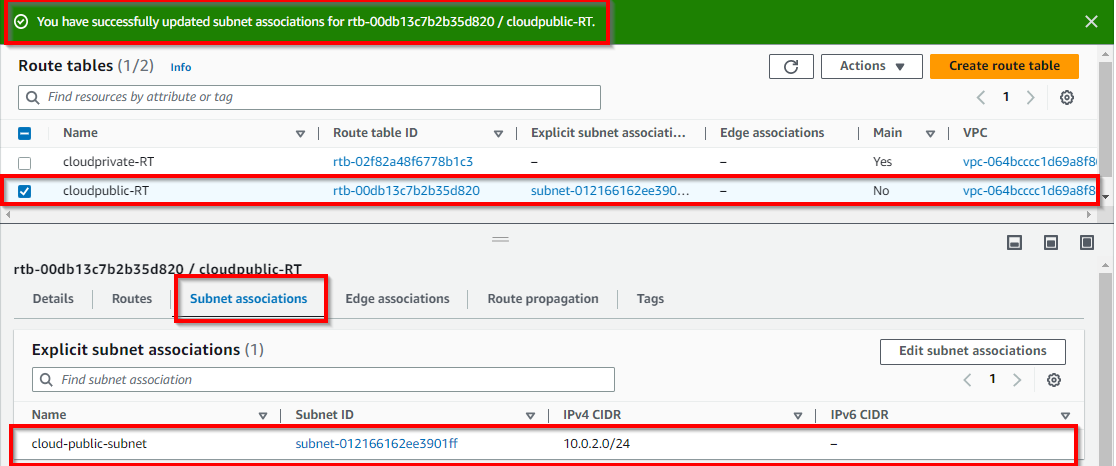
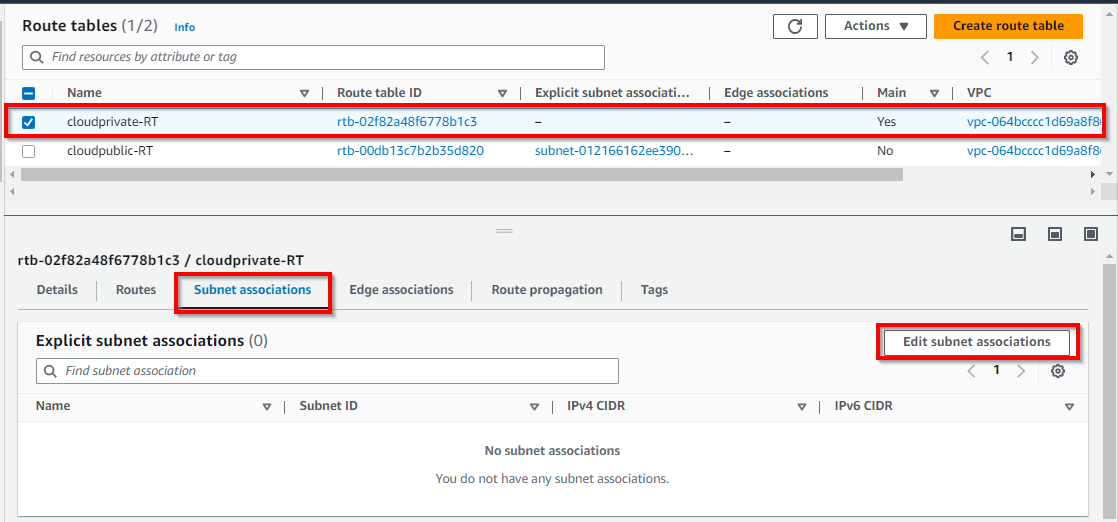
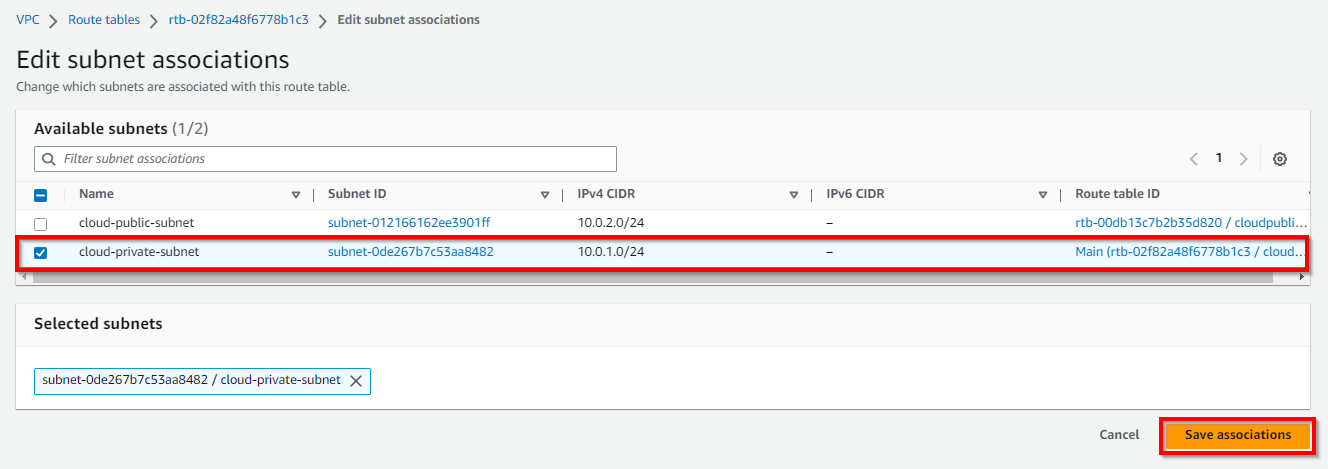
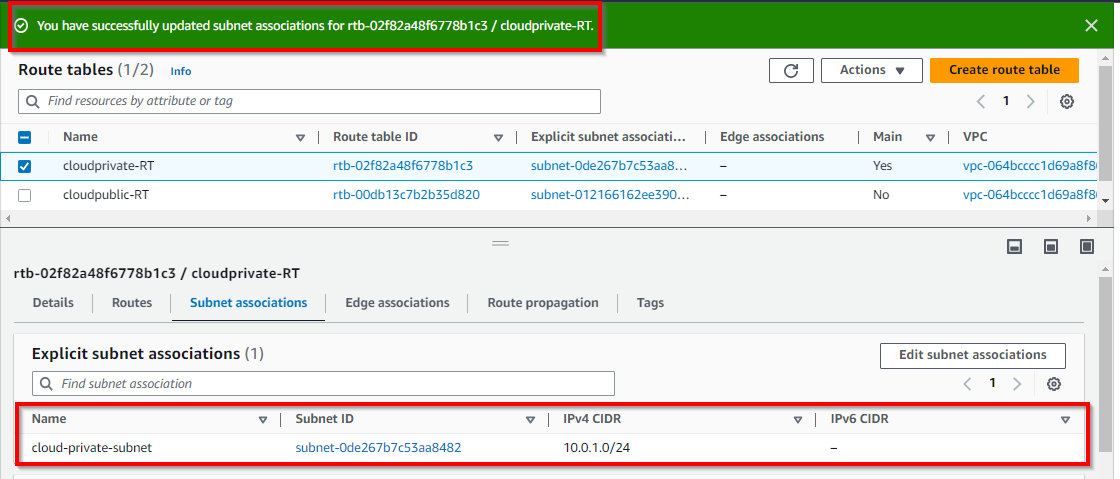
Attaching the private subnet to the private route table
Now we repeat the same procedure to add the subnet for the private route table, and select the checkbox for the private route table (cloudprivate-RT). Click on Subnet associations.
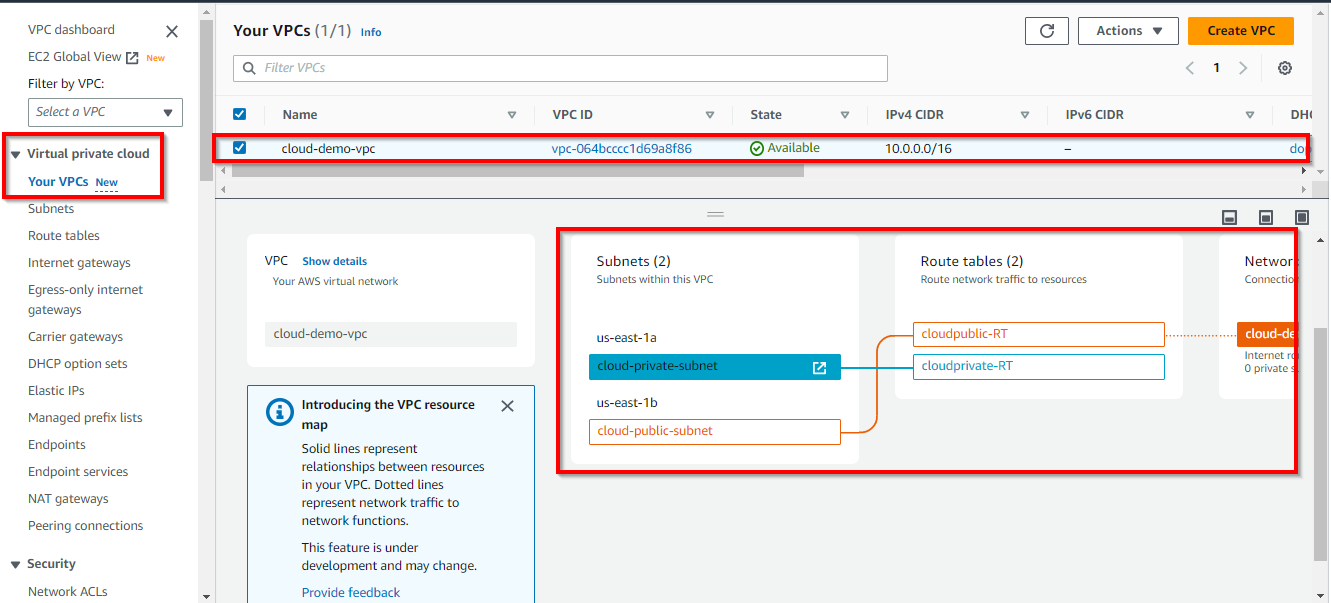
Resource Mapping from subnets to route tables
Navigate to "Your VPC" under the virtual private cloud menu and select the check box of the VPC you created (cloud-demo-vpc), scroll down and select the Resource map tab and view how the created subnets are mapped to the route tables
NB: (this visualization shows if your connection is correct or wrong)
Configuring Security Group and Network ACL
Security groups
Now we configure security group to restrict inbound traffic from the internet to the VPC.
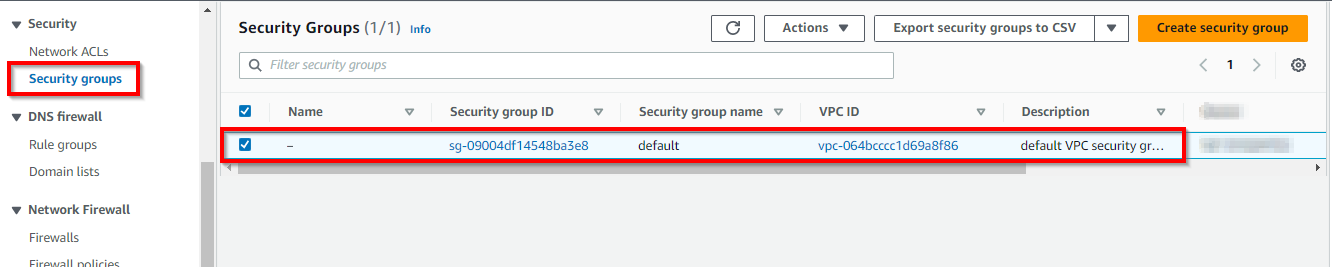
In the VPC console, navigate to Security groups Under Security in the left pane. Here, you notice that a default security group has been created automatically. To confirm if the security group created is attached to your VPC. Scroll to the right and confirm the VPC ID with what you copied in your Notepad or sticky note. {the VPC ID MUST CORRESPOND}
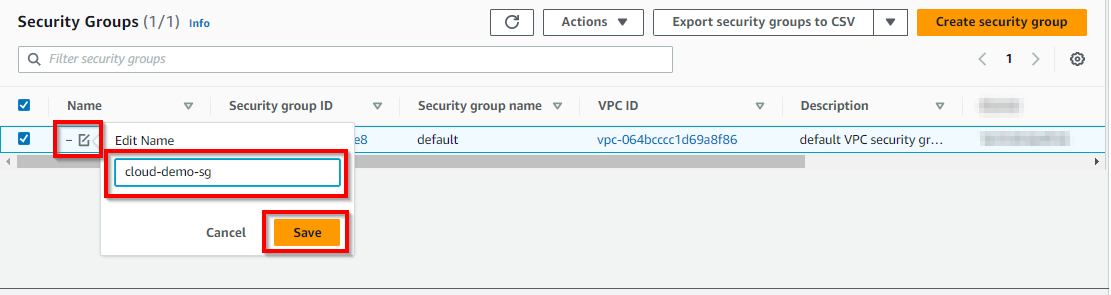
Now click on the edit icon under Name for the security group of your VPC and enter a name (cloud-demo-sg). Click on Save.
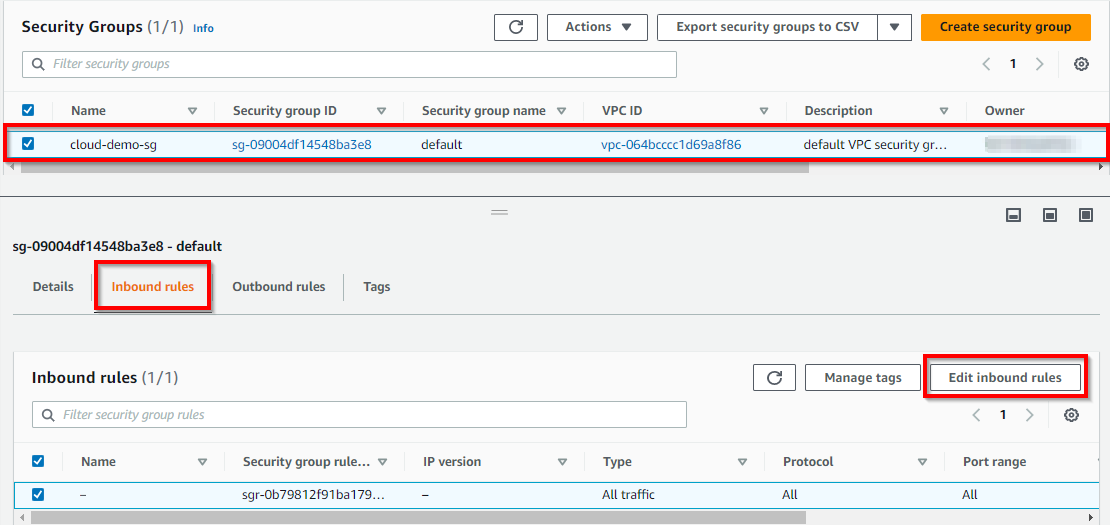
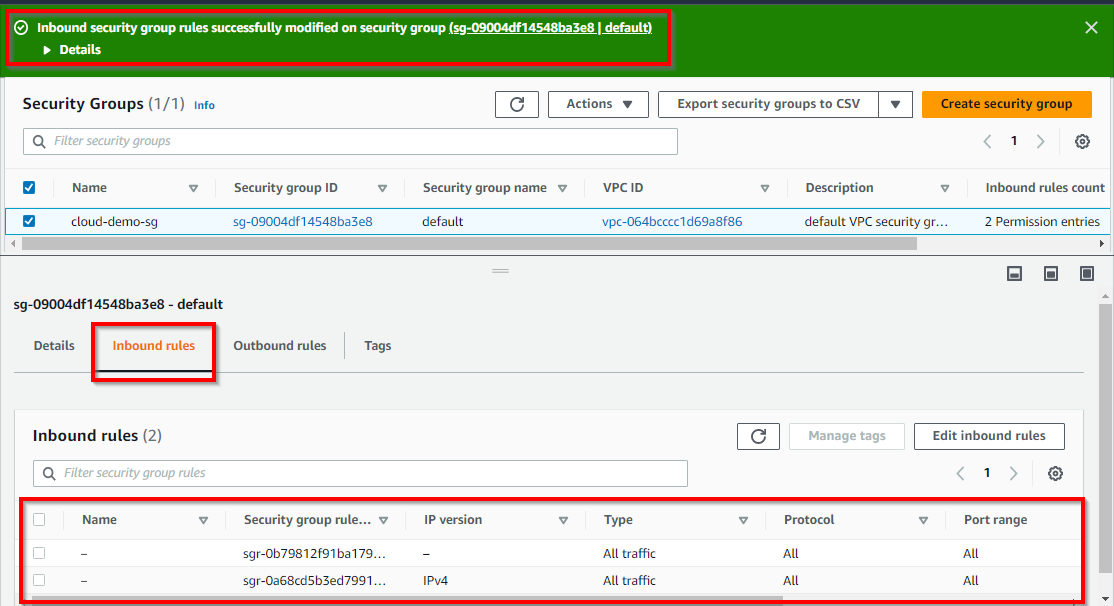
Once done, select the checkbox for the security group (cloud-demo-sg). Click on the Inbound Rules tab. Then click on Edit inbound rules to configure the incoming traffic.
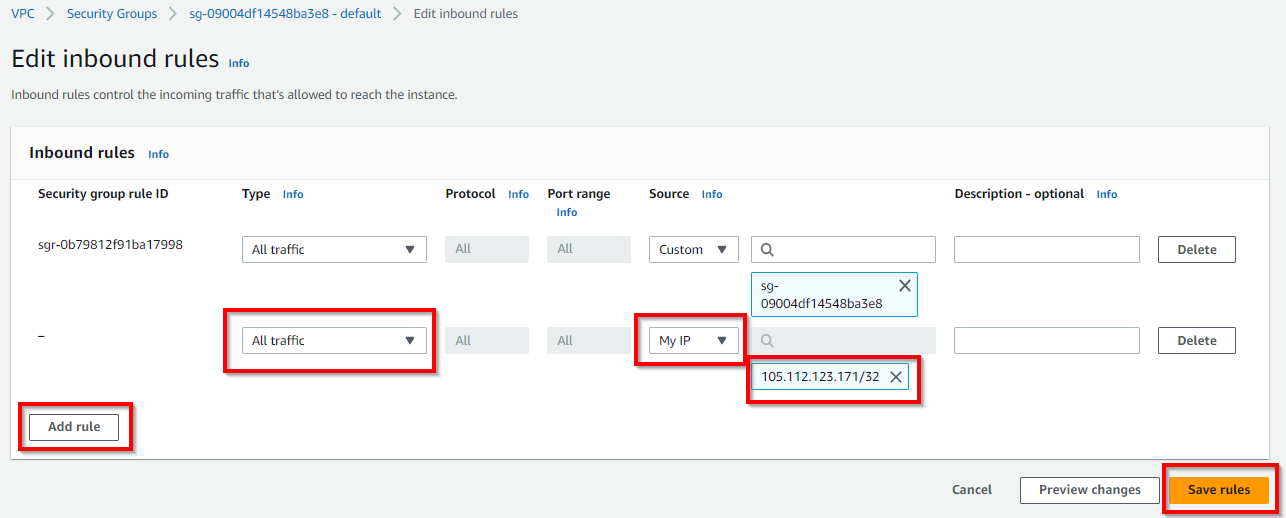
Click on Add rule.
Under Type: select All traffic; Under Source: select My IP; this will restrict any inbound traffic to only your computer IP. Then click on Save rules.
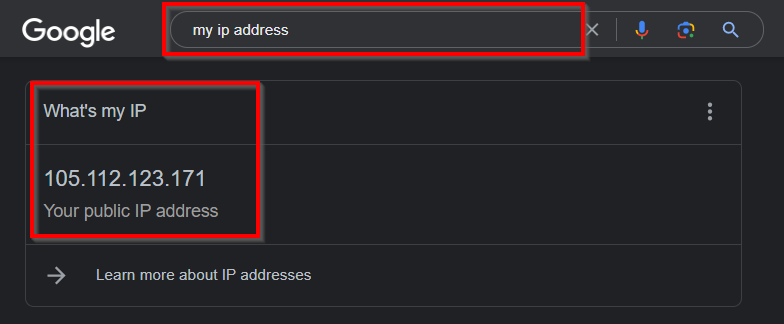
To confirm your computer IP address, navigate to google chrome and Type “My IP Address”
You will notice the MY IP which was automatically inputted is the same with the “My IP Address” on your PC.
Now, the inbound rules have been updated for the security group.
Network ACLs
Next, click on Network ACLs in the left pane to configure the access control for the subnets.
- You will notice that a default network ACL for the subnets was automatically created. Confirm if the network ACL created is attached to your VPC by corresponding it with the VPC ID you copied to your Notepad or sticky note.

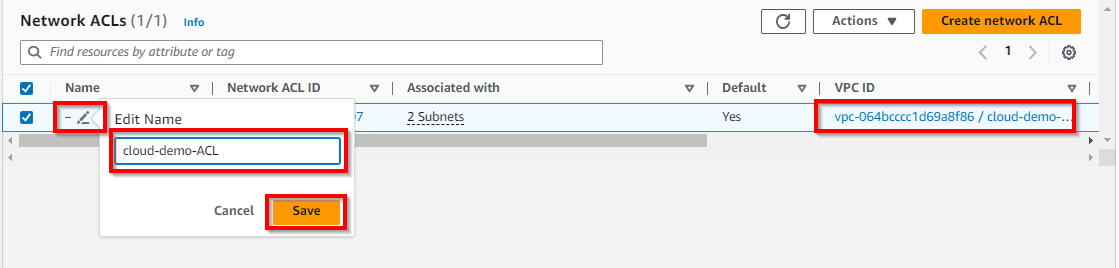
Now edit the icon under Name for the network ACL of your VPC. Enter a name (cloud-demo-ACL) under Edit name. Click on Save.
Now configure the network ACL to restrict traffic to only allow traffic from your IP (as shown in the security group configuration above).
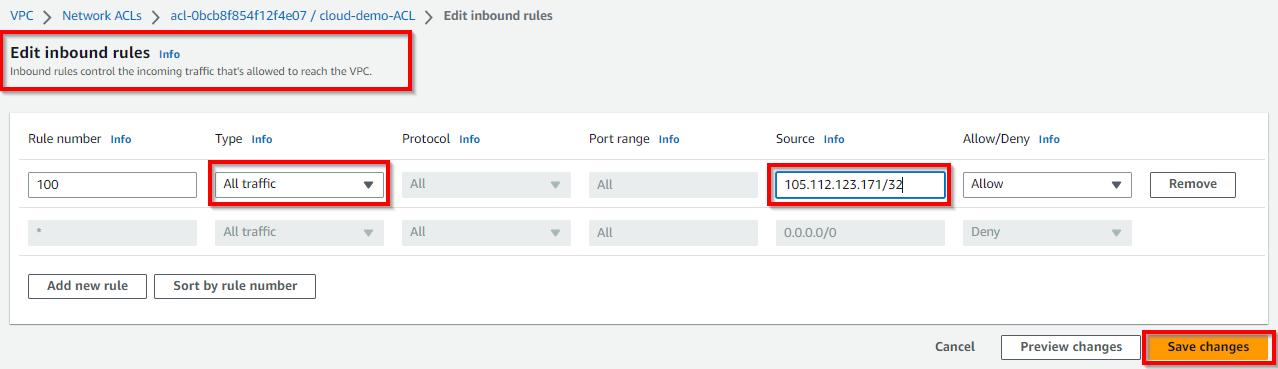
- Select the checkbox for the network ACL (cloud-demo-ACL), then click on Inbound Rules. (Here, you can see that all traffic is allowed.) Then click on Edit inbound rules
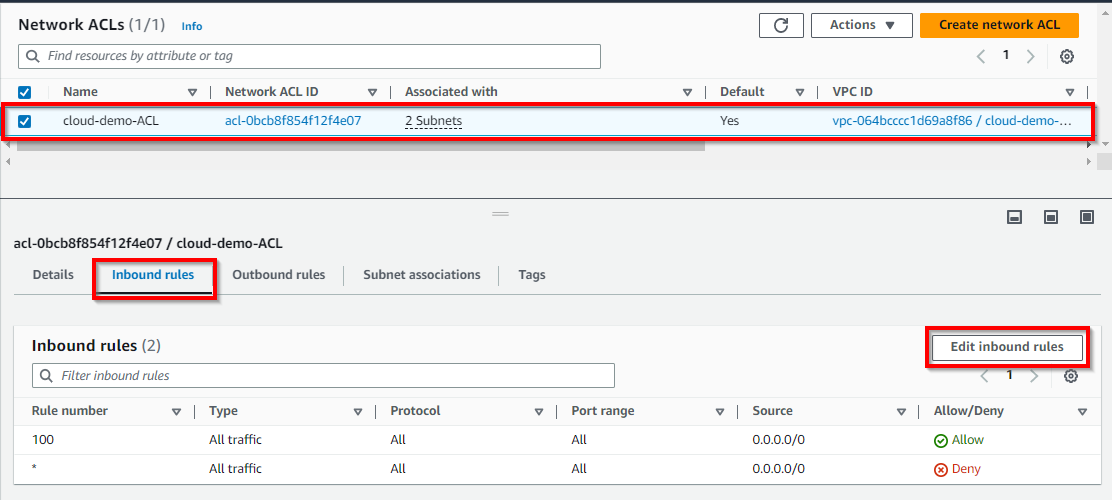
On the Edit inbound rules page, under Source, change it from 0.0.0.0/0 to your IP (your computer's public IP), as shown above when configuring the security group. {105.112.123.171} Once done, click on Save Changes.
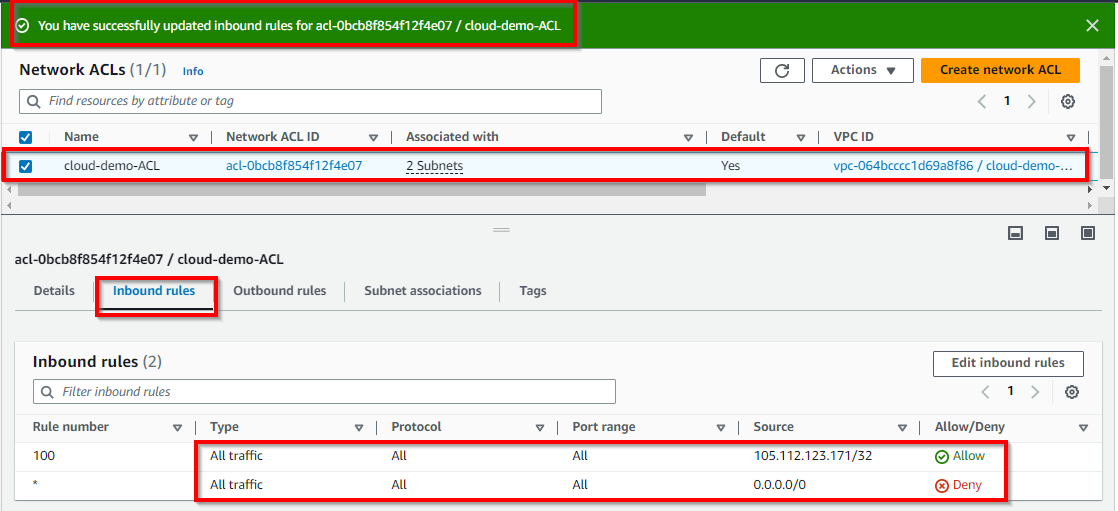
Thus, the inbound rules for the network ACL are successfully updated.
Creating EC2 instances in both public and private subnets
Creating EC2 Instance in Public Subnet
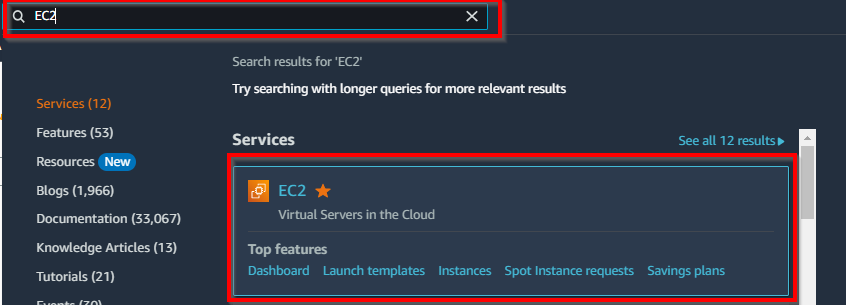
Navigate to the search box and type EC2.
In the EC2 Dashboard, click on Instances under Instances in the left pane and click on Launch Instances from the top right of your screen.

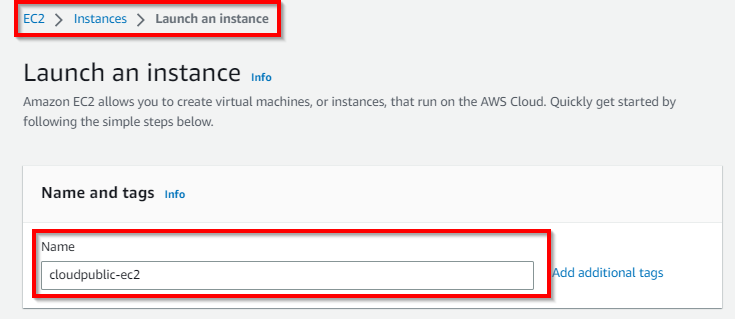
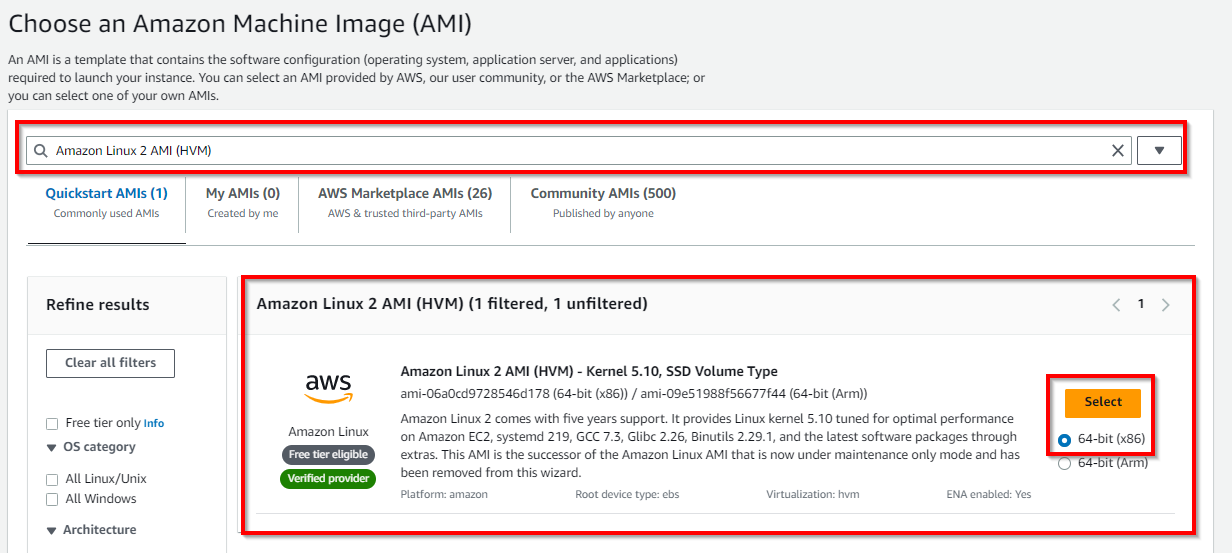
In the Launch an instance page, under Name and tags, enter a name (e.g., cloudpublic-ec2) for the public EC2 instance, and for Application and OS Images (Amazon Machine Image), select Amazon Linux 2 AMI (HVM) under the Amazon Machine Image.
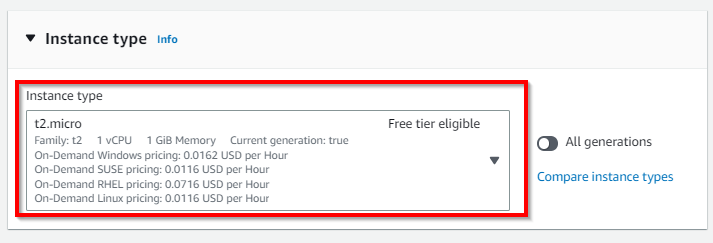
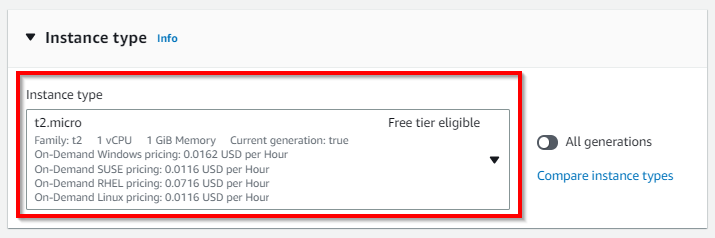
Scroll down to Instance Type and select t2.micro, which is eligible for the free tier
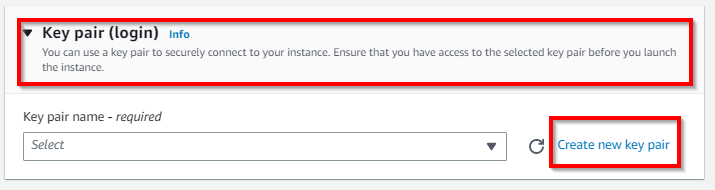
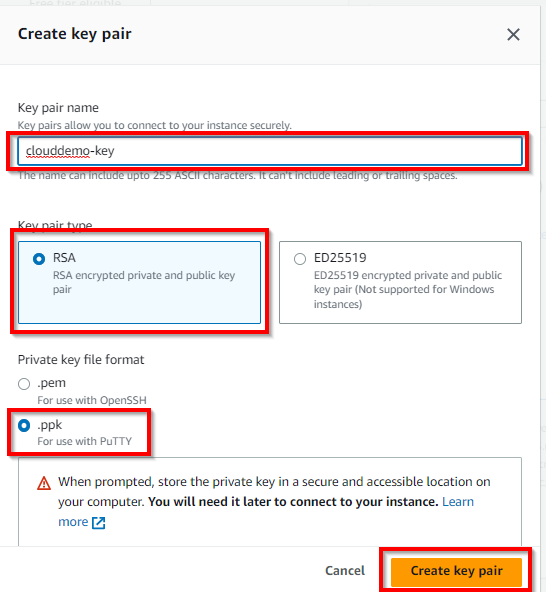
Scroll down under the “Key pair (login)” section, and click on Create new key pair. A pop-up appears to enter a name (e.g. clouddemo-key) under the key pair name, select RSA in the key pair type, and select .ppk under the Private key file format. Click on Create key pair. Hence, the key pair is downloaded to your local machine with .ppk extension (e.g. clouddemo-key.ppk).
NB: the .ppk key pair is used for Windows SSH connection by using Putty software to access your EC2 instance on CLI (command line interface)

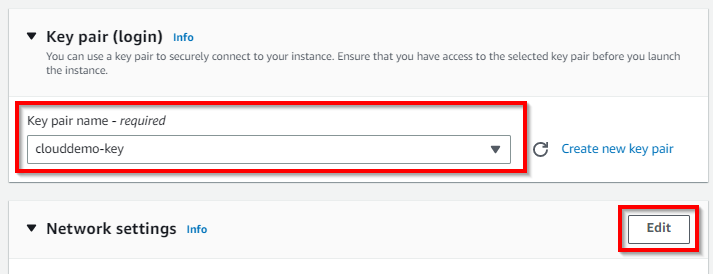
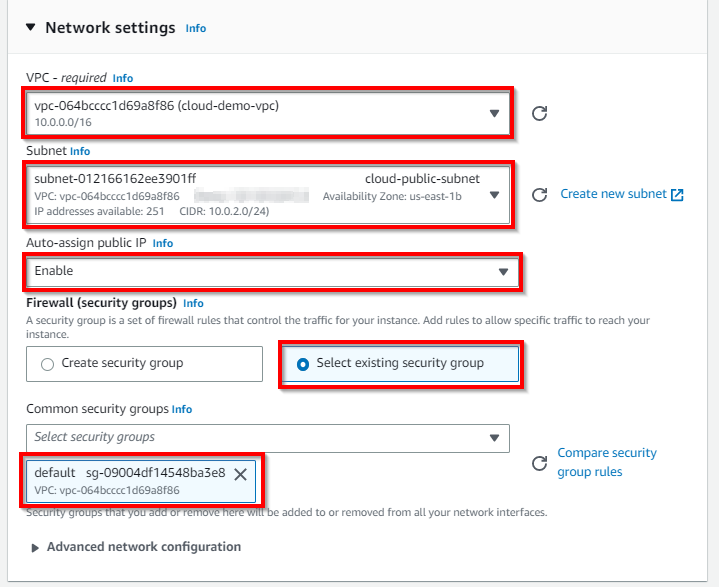
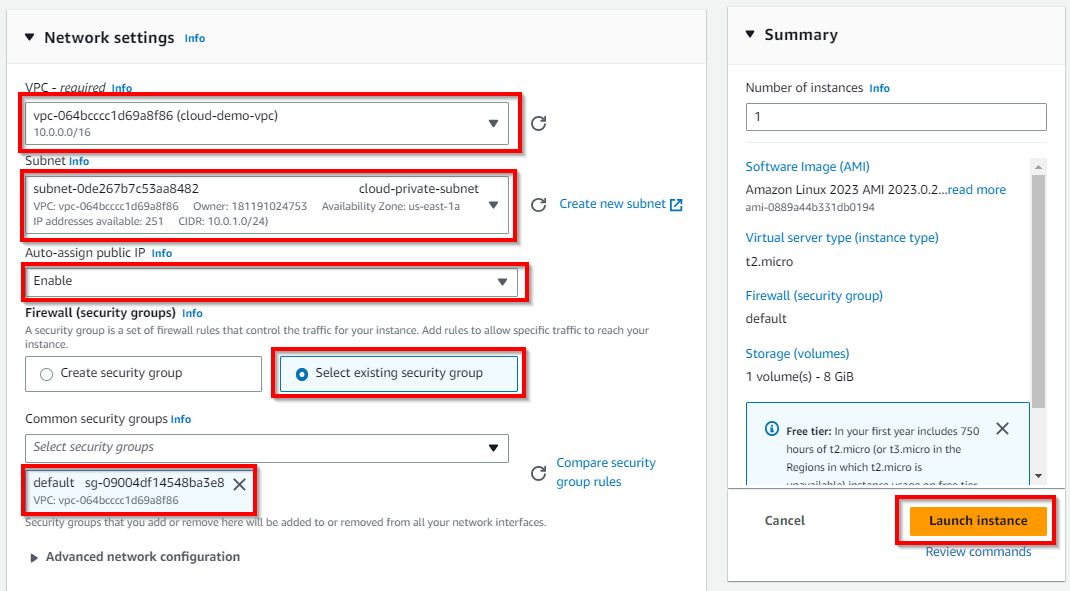
Scroll down to the Network Settings section and click on Edit. Under VPC, select your VPC network (e.g cloud-demo-vpc) or check with your sticky note or notepad. Under Subnet, select the public subnet (cloud-public-subnet) to configure the first EC2 instance. For Auto-assign Public IP, select Enable from the drop-down, then select the radio button for Select an existing security group, then select the checkbox for the security group you have configured for the VPC. {Default security group}.
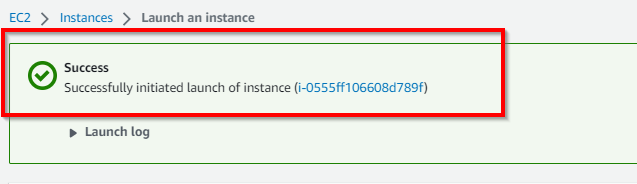
Retain other default settings, then scroll down, and at the bottom right, click on Launch Instances. Now, we have successfully created an EC2 instance in a public subnet.
Creating EC2 Instance in Private Subnet
Now, we create a new EC2 instance for the private subnet. For that, click on Launch instances. (Similar process of creating EC2 in the public subnet)

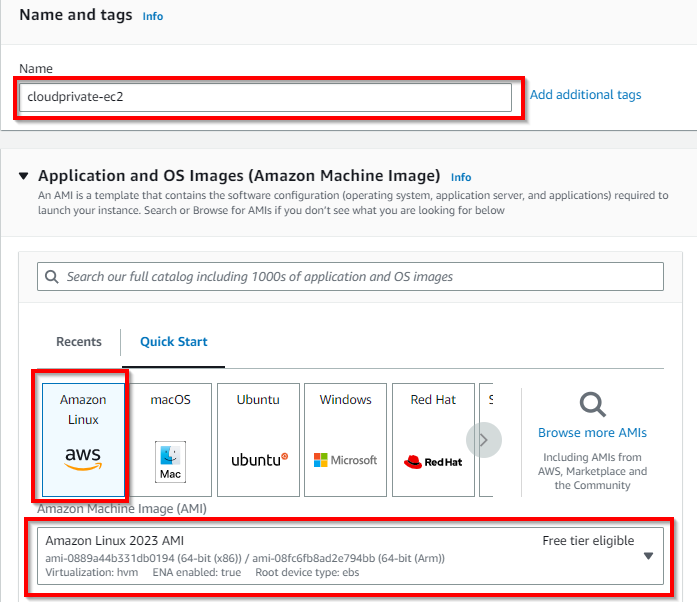
In the Launch an instance page, under Name and tags, enter a name (cloudprivate-ec2) for the private EC2 instance, and for Application and OS Images (Amazon Machine Image), select Amazon Linux 2 AMI (HVM) under the Amazon Machine Image.
Scroll down to Instance Type and select t2.micro, which is eligible for the free tier.
Scroll down to the key pair (login) section. Under the key pair name, select the same name (clouddemo-key) entered by you while configuring the previous public EC2 instance key pair, as shown above.

Scroll down to the Network Settings section and click on Edit. Under VPC, select the VPC network (cloud-demo-vpc) created by you in the previous steps. For the subnet, select the public subnet already created (cloud-private-subnet). For Auto-assign Public IP, select Enable from the drop-down, and select the radio button for Select an existing security group. Select the checkbox for the security group you have configured for the VPC.
In the Configure Storage Section, retain the default settings and click on Launch instance. Now, we have successfully created an EC2 instance in a Private subnet. Navigate to instances to view the instance created.

Testing access to both instances.
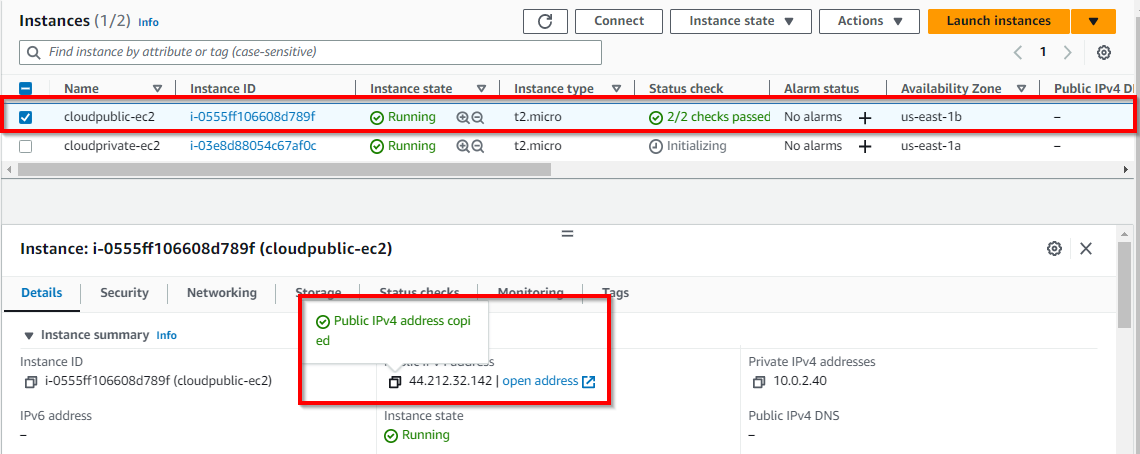
First, we copy the public IP of the public subnet (cloudpublic-ec2) and ping it via the command prompt. Select the checkbox for the public subnet (cloudpublic-ec2) and copy the public IPv4 address under the Details tab.
Open your command prompt

Type ping {"public IP address of the public instance you copied"} and press, Enter to test access to the public EC2 instance. You will receive a reply which indicates that there is public access to the instance (cloudpublic-ec2) in the VPC.
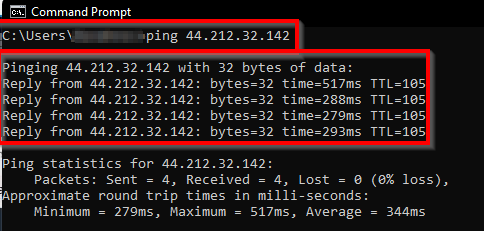
NB: Note: Replace {"public IP address of the public instance"} with your IP address of the public EC2 instance.
Navigate back to your AWS console and select the checkbox for the EC2 private instance (cloudprivate-ec2) in the private subnet. Copy the private IPv4 address.
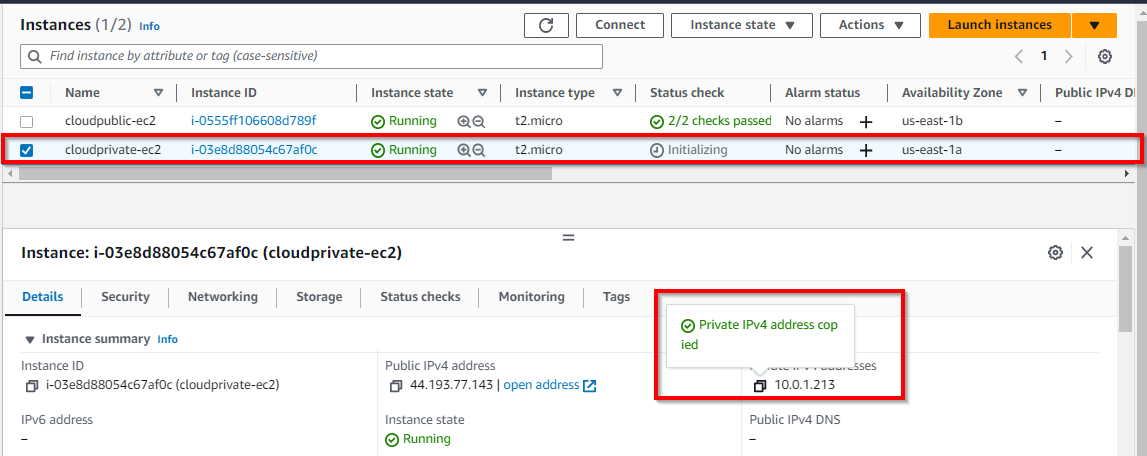
Mini Task
Navigate to the Command Prompt and type ping {"The private IP address of the private instance that you copied"} and press Enter to test access to the EC2 instance (cloudprivate-ec2) in the private subnet. You will not receive a reply because the instance is in the private subnet.
Note: Replace {" private IP address of the private instance"} with your IP address of the private EC2 instance.
Finally, as a beginner in Cloud security, you should understand how to secure instances within a Virtual Private Cloud (VPC) by configuring a public subnet for internet-accessible instances and a private subnet for isolating instances from the internet.
Tear Down your resource
Once done with the lab, ensure you delete, shut down, or terminate all resources created and used in this lab to prevent billing from AWS.
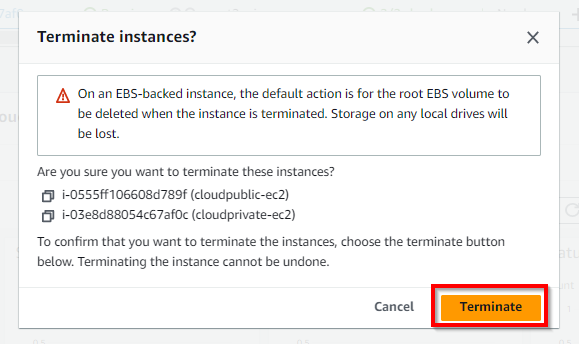
Now delete the instances created in this lab. Navigate to the Instances under EC2 and select the checkbox of the instances created in this lab (here, cloudpublic-ec2 and cloudprivate-ec2). Select the Instance State drop-down and click on Terminate instance. In the pop-up window, click on the Terminate button.

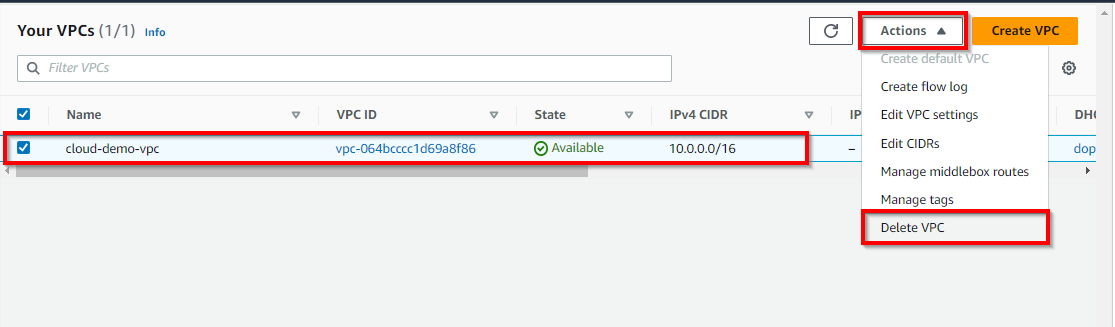
- Navigate to the Your VPCs under the VPC console and select the checkbox of the instance created in this lab (here, cloud-demo-vpc). Select the Actions drop-down and click on Delete VPC.
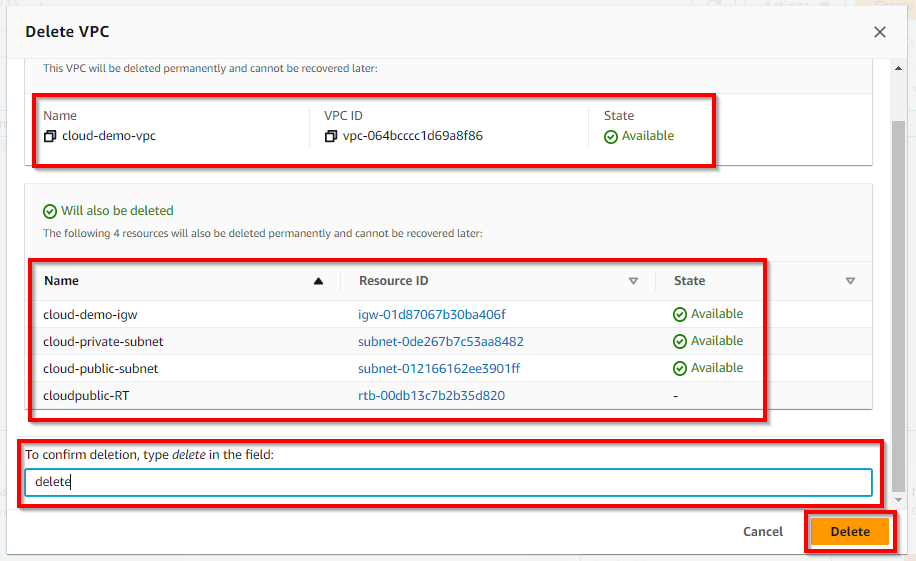
Note: In the pop-up window, enter delete and click on the Delete button. It will delete the Subnets, Route tables, Internet gateways, Network ACLs, and Security groups associated with the VPC.