Restricting Access to AWS S3 Buckets using ACL and Bucket Policy

Introduction
Amazon S3 enables seamless upload and retrieval of data from any location on the Internet. It organizes data as objects, including text files, photos, and videos, which are stored within designated buckets. By default, authorized users have access to all Amazon S3 buckets, but access permissions can be further customized using a combination of bucket policies, ACLs, and IAM policies to ensure appropriate access is granted to specific entities.
Lab Objective
The purpose of this lab is to showcase the process of configuring S3 resources. This involves creating bucket policies and Access Control Lists (ACLs) to grant access to specific entities.
Disclaimer
Please note that the AWS management console is subject to change over time. While the instructions provided are accurate at the time of writing, there may be updates or modifications to the console's interface or functionality. It is advisable to refer to the official AWS documentation for the most up-to-date and accurate information regarding the AWS management console
Lab Tasks
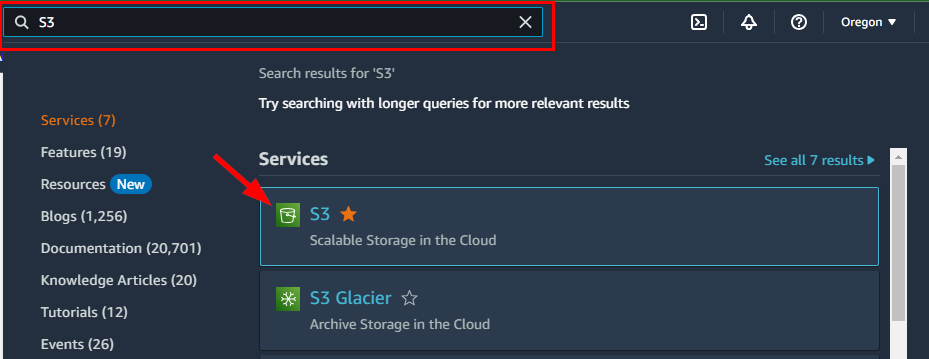
- Sign in to your AWS management console and search for S3 in the search box.
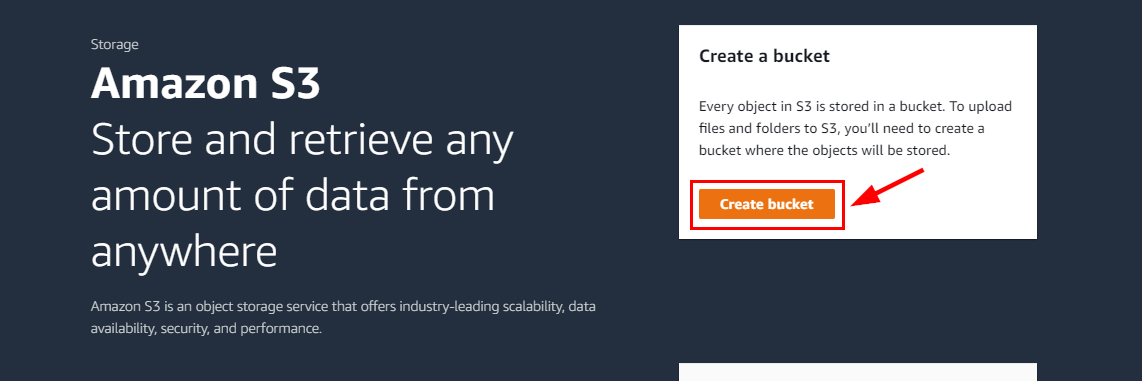
- On the Amazon S3 Page, click on Create Bucket.
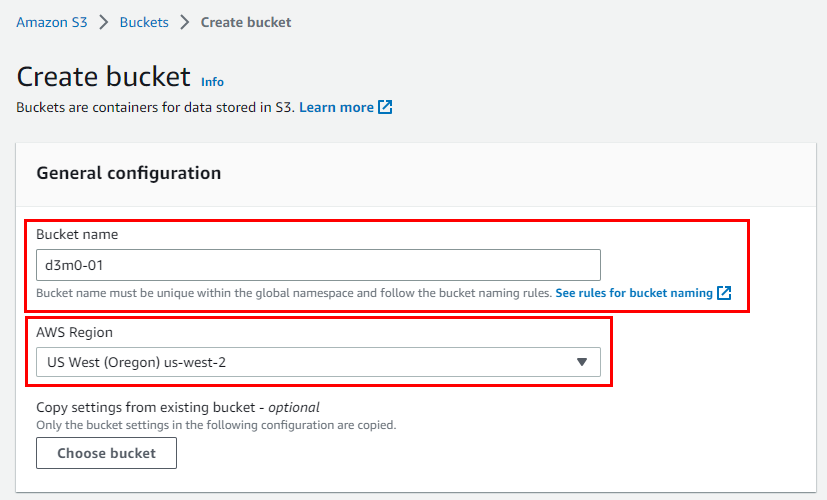
- Within the Create bucket window, designate the Bucket name as "d3m0-01" Next, choose a suitable AWS Region from the available options. In this lab, the region selected is us-west-2 (Oregon)
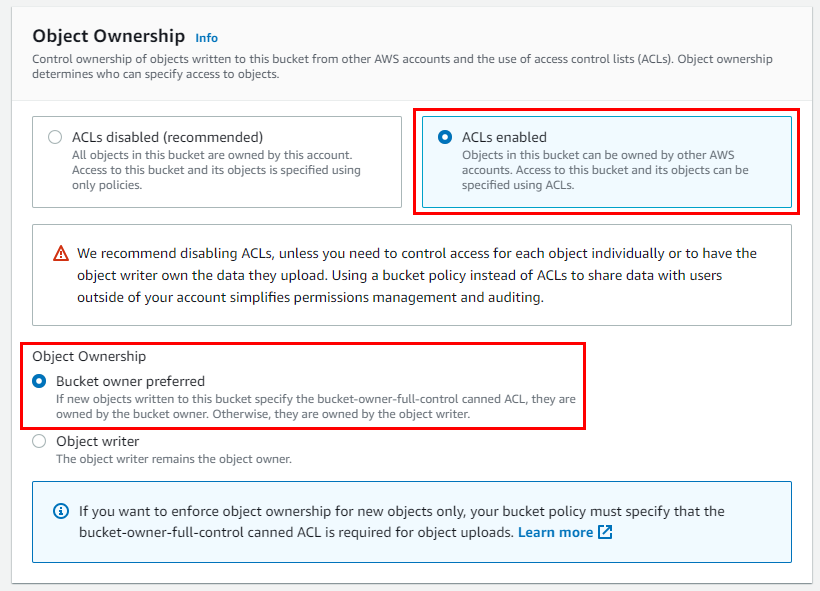
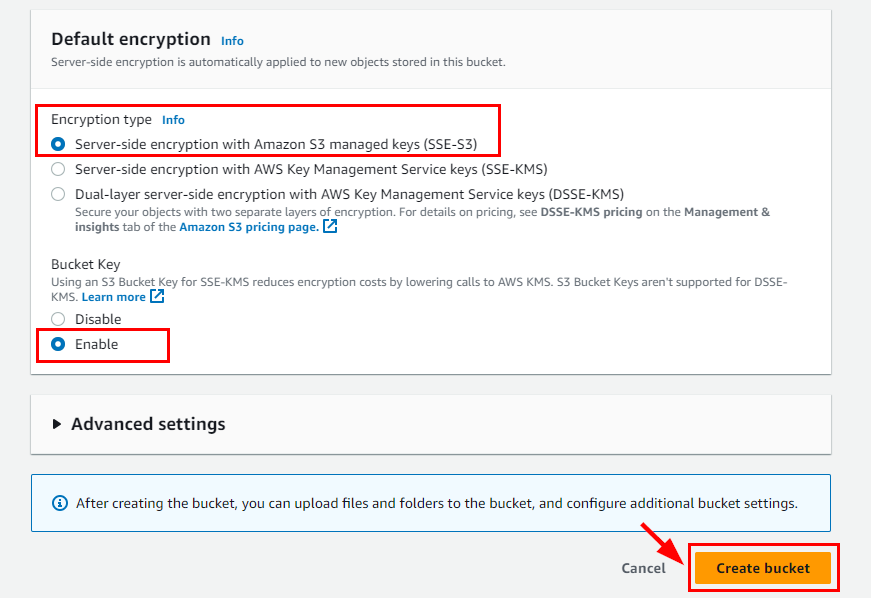
- Under Object Ownership, click on the ACLs enabled radio button and retain the other default settings. Scroll down to the bottom and click on Create Bucket.
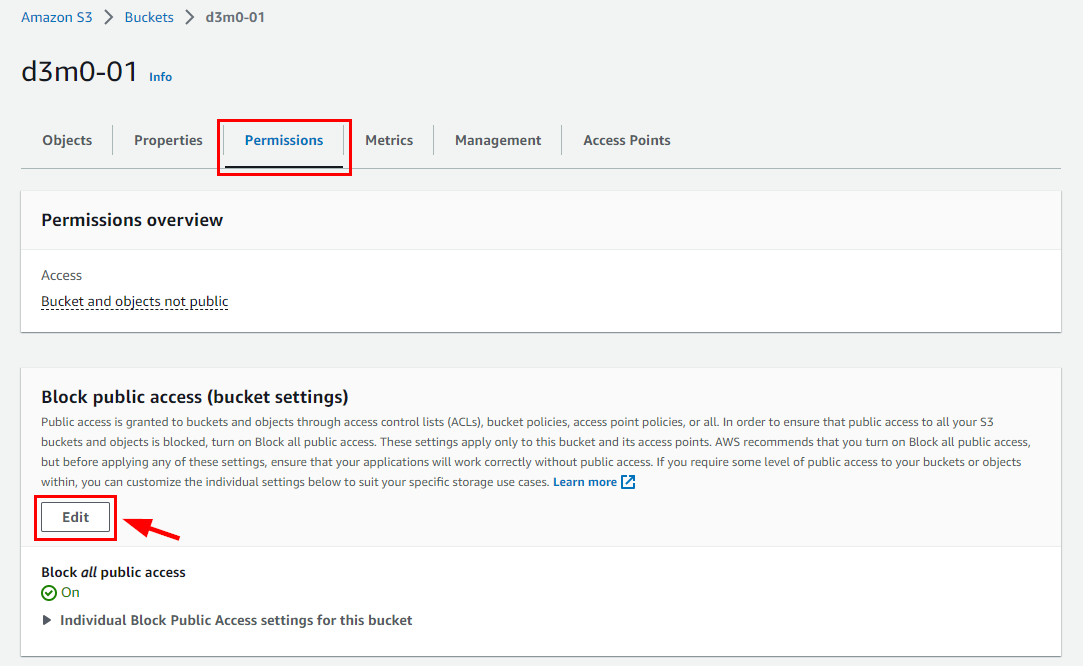
- The bucket name “d3m0-01” was successfully created. Next, click on the S3 bucket (here, d3m0-01) that you had created to edit the S3 bucket’s public access settings.

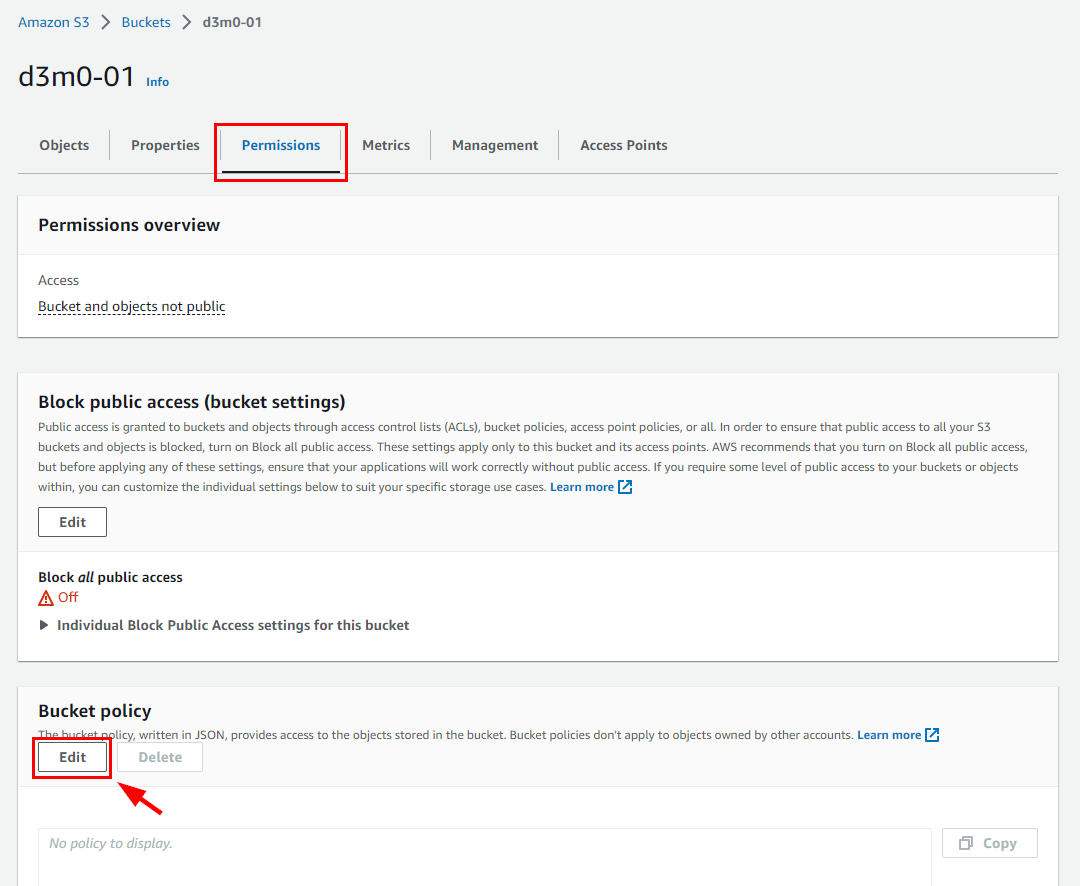
On the “d3m0-01” bucket page, Click on the Permissions tab. To make changes, click on Edit, as depicted in the provided screenshot.
NB: The Block public access (bucket settings) is enabled by default.
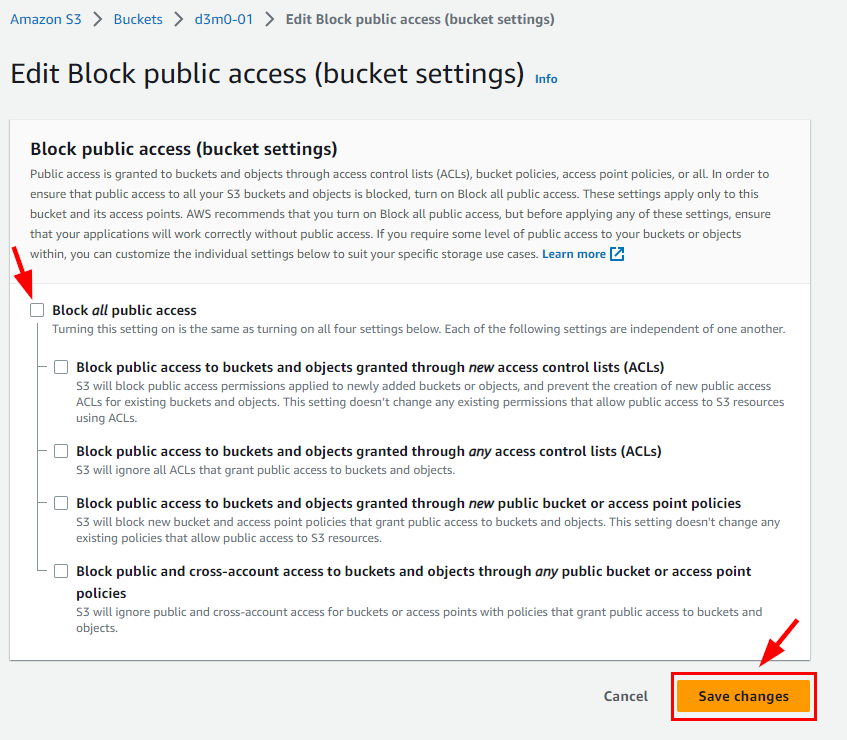
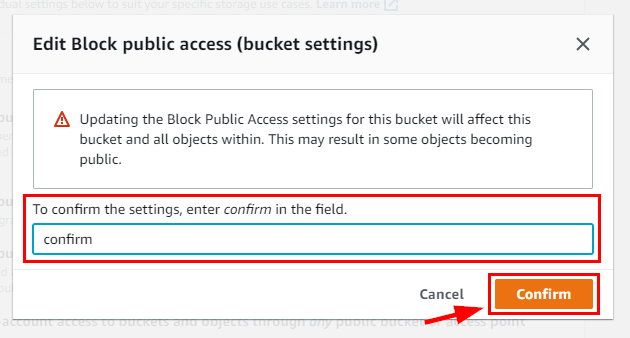
Uncheck Block all public access to allow public access to the bucket. Then, click on Save Changes. A confirmation dialog appears. Type confirm, then click on confirm.
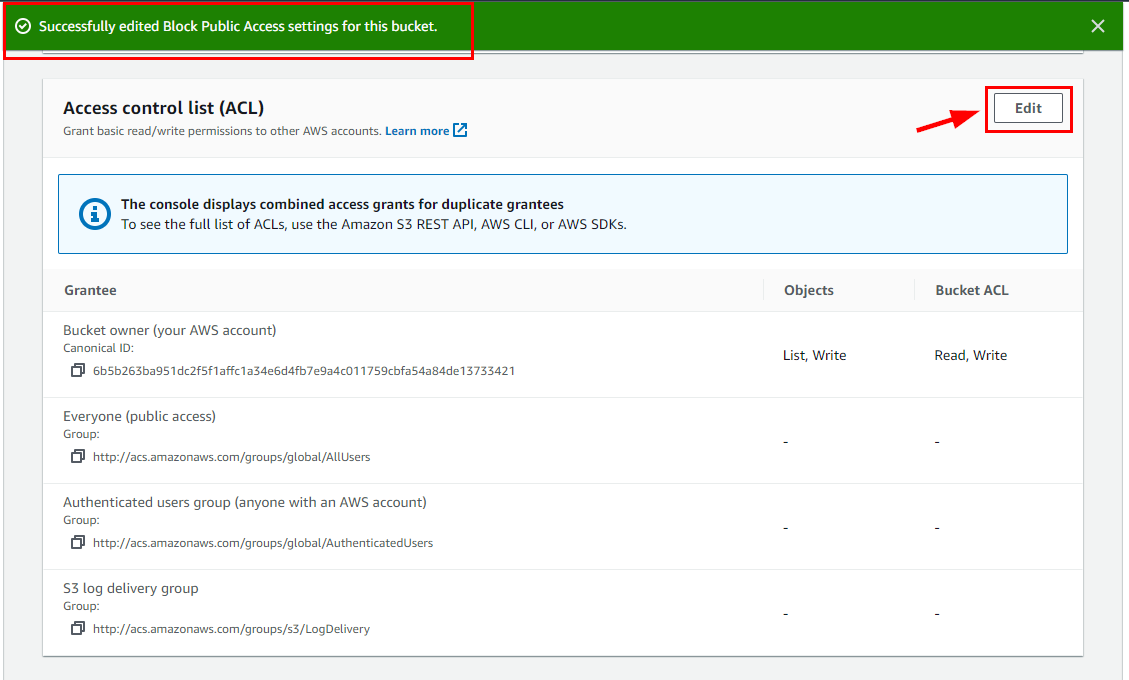
- The Block Public Access settings were updated successfully. Scroll down to Access Control List on the same Permissions tab to edit the read/write permissions of the S3 bucket. Then, click on Edit.
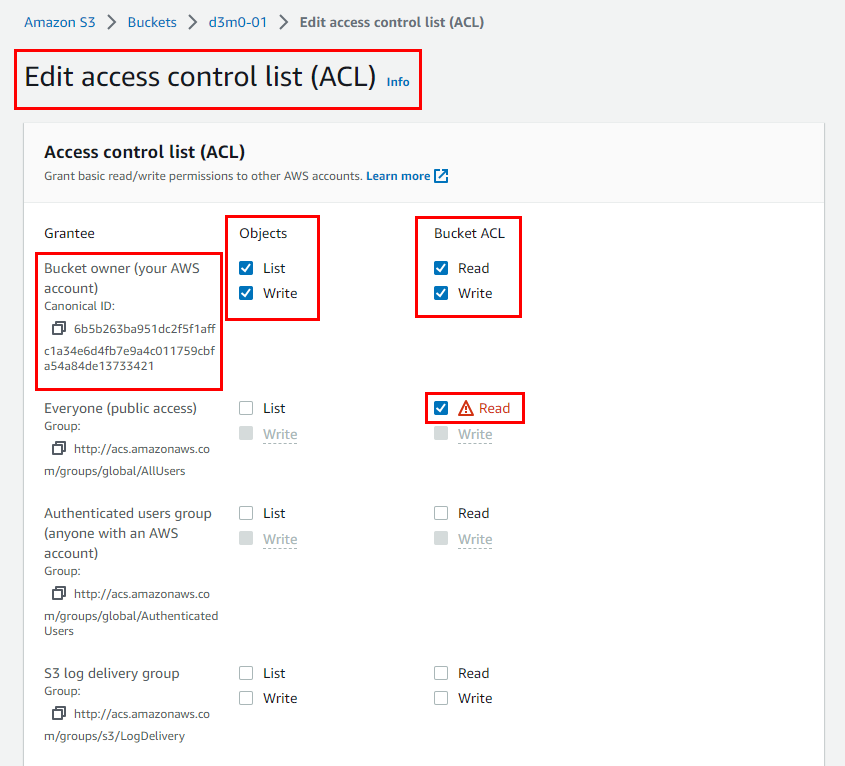
- In the "Edit access control list (ACL)" page, you can allocate permissions for the S3 bucket within the "Access Control List (ACL)" section. Assign the desired permissions for the (Bucket owner, Everyone, the authenticated users group, and other relevant entities). Specifically, for the Bucket owner (your AWS account), ensure to select the checkboxes for List and Write under Objects, as well as Read and Write under Bucket ACL, to grant comprehensive permissions. Finally, save the changes by clicking on the "Save" button.
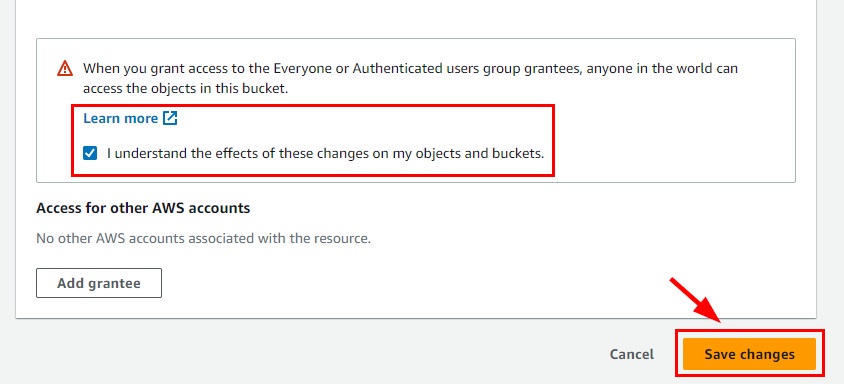
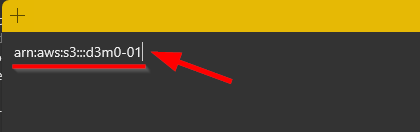
- The modifications to the public access settings and ACLs were successfully applied. In order to generate a bucket policy for "d3m0-01," you will require its ARN. Simply navigate to the Properties Tab, and Click on Copy Bucket ARN, as shown in the screenshot below.
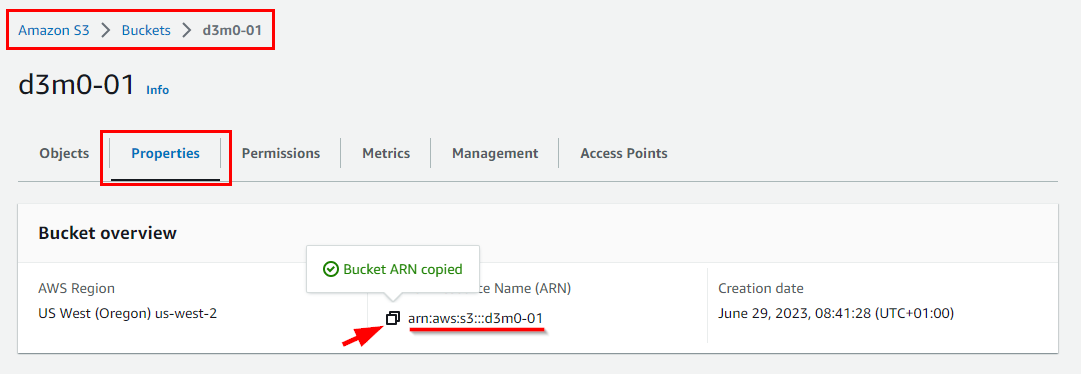
- Open a sticky note or Notepad and paste the copied ARN into it.
- To configure the bucket policy of the S3 bucket, navigate to the Permissions section on the d3m0-01 page. Scroll down to the Bucket Policy subsection within the Permissions tab and choose Edit.
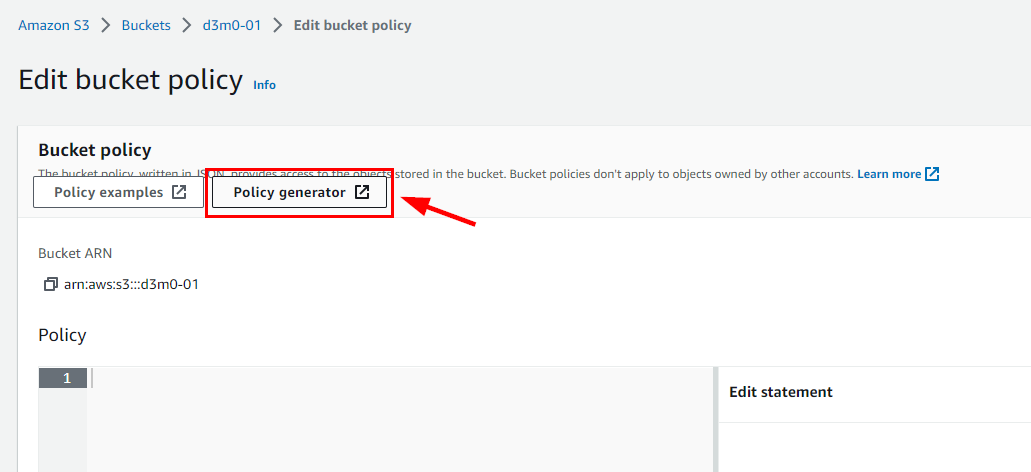
- Click on the Policy generator link, as shown in the screenshot below. A new browser tab opens. Switch to the new tab.
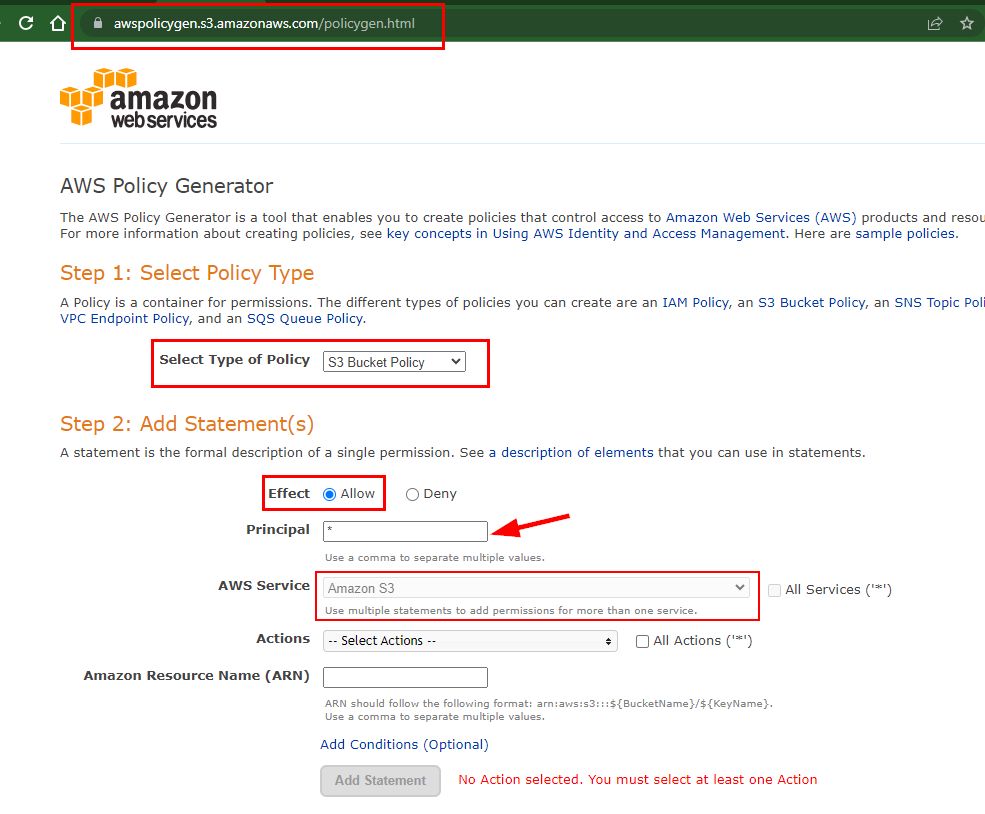
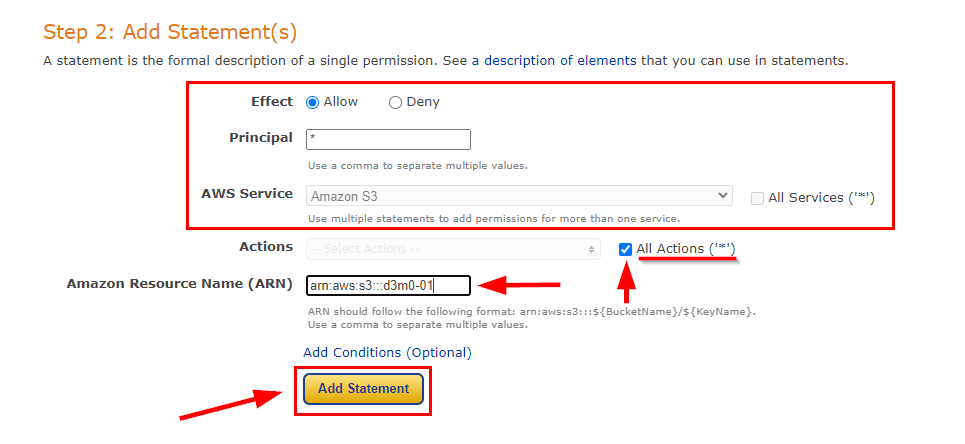
- In the new tab for AWS Policy Generator, as shown below. Choose "S3 Bucket Policy" from the dropdown menu under "Select Type of Policy." To grant access, set the "Effect" to "Allow." In the "Principal" field, input a wildcard symbol (*) to authorize permissions for all users. Lastly, select "Amazon S3" as the "AWS Service" from the dropdown menu. (It is selected by default.)
- Switch to your Notepad or sticky note and copy the ARN that you had copied earlier. Check the All Actions checkbox and paste the copied ARN in the Amazon Resource Name (ARN) field. Then, click on Add Statement. Once the statement is added, click on Generate Policy under Step 3: Generate Policy.
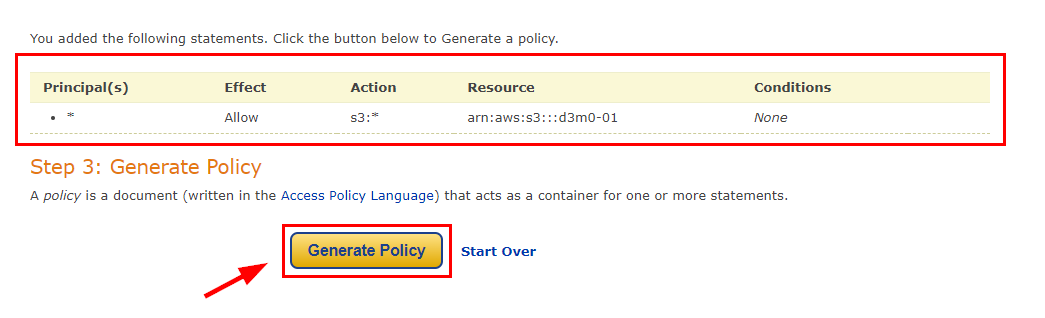
- A Policy JSON Document pop-up appears along with the generated JSON code. Copy the code from the provided screenshot and then proceed to click on the Close button.

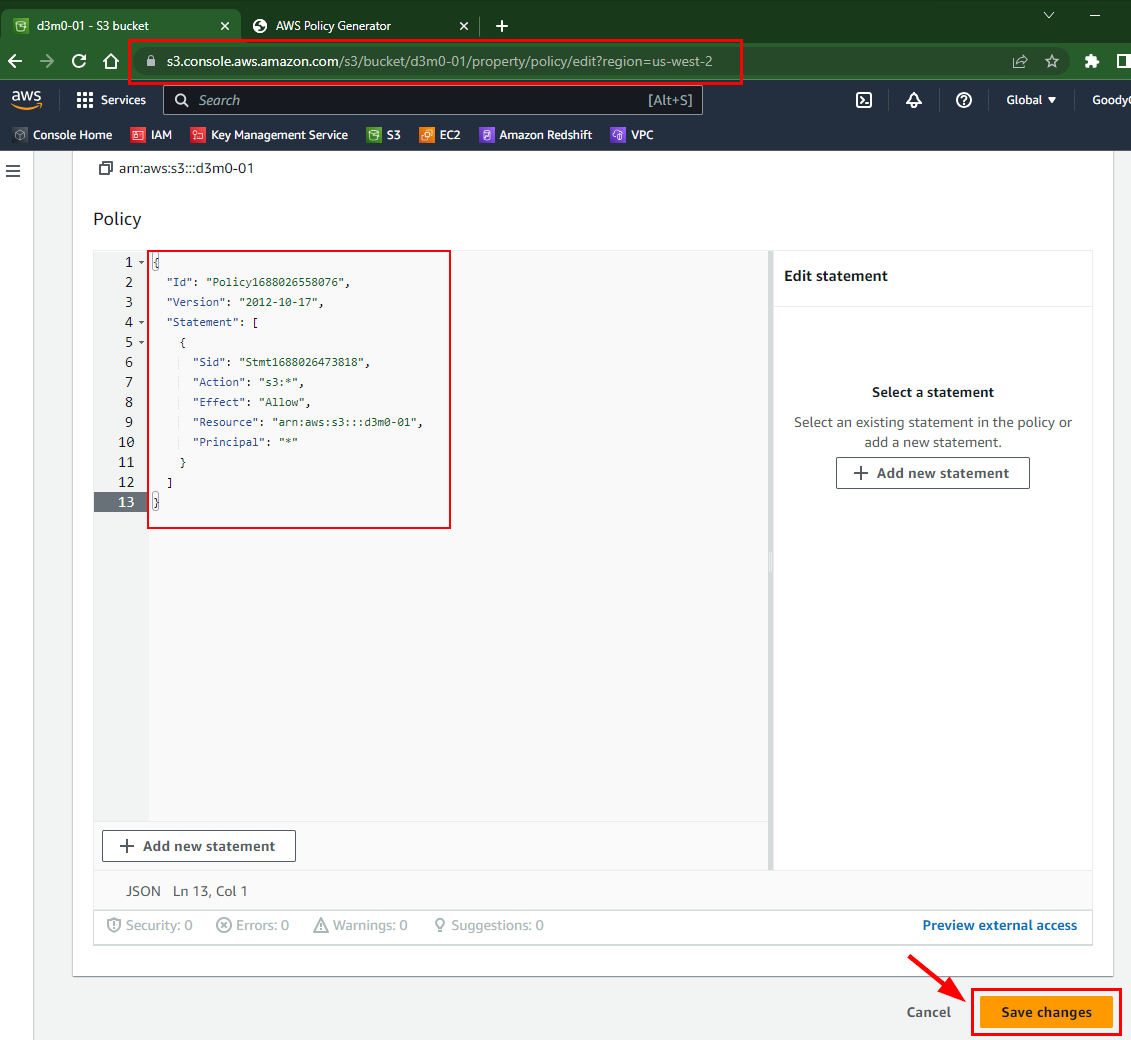
- Switch to the first tab of the browser (Edit Bucket Policy) to configure the bucket policy. Paste the copied JSON code in the Bucket policy editor under Policy. Then, click on Save Changes.
By implementing this lab, a cloud security engineer can utilize ACLs and bucket policies to grant permissions to S3 buckets within AWS.
NOTE: To prevent incurring charges, it is important to delete, shut down, or terminate all resources that were created and utilized during this lab.
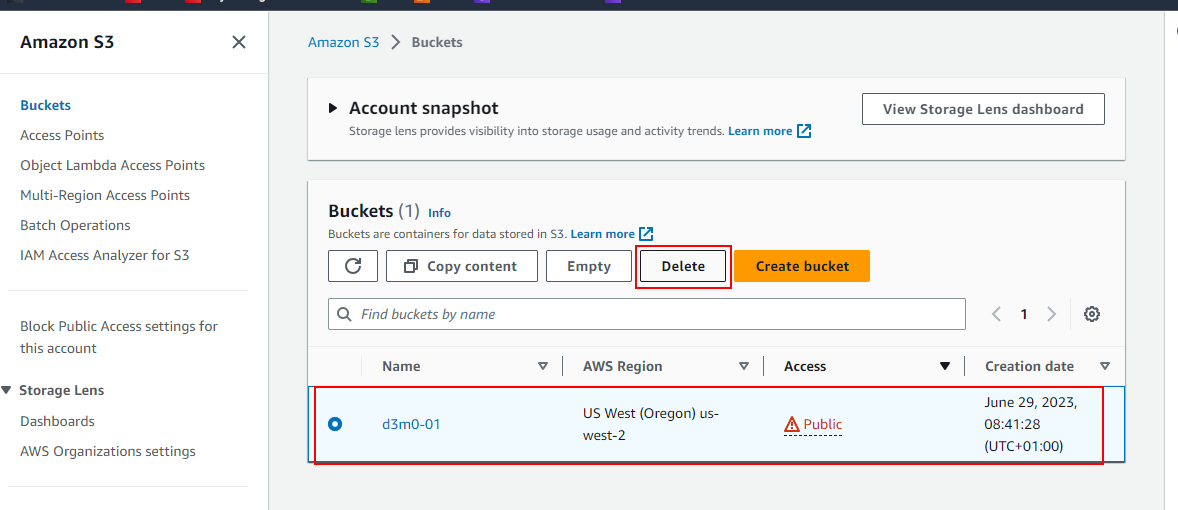
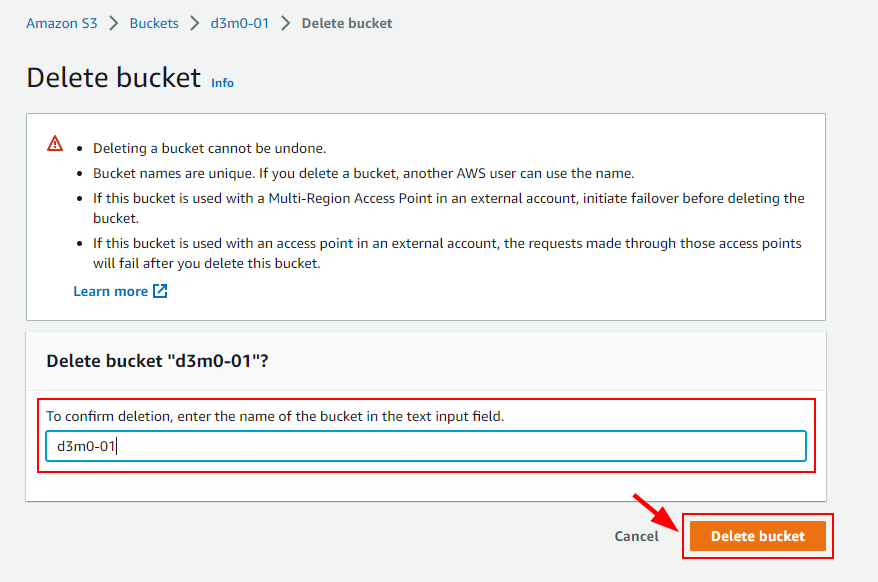
- Now, proceed with deleting the resources that were created in this lab. Go to the Buckets section in Amazon S3 and choose the checkbox corresponding to the bucket you wish to remove (in this case, d3m0-01). Click on the delete button. In the prompted window, provide the name of the bucket and select the Delete bucket button to complete the deletion process.
Lab Conclusion and a Light-hearted Joke
And now, for a lighthearted moment to wrap up this lab write-up:
Before we conclude, here's a little joke to lighten the mood:
Why did the developer go broke?
Because he lost his bucket (policy)! 😉
Alright, with that good-natured chuckle, we've successfully covered the process of restricting access to AWS S3 buckets using ACLs and Bucket policies.
Note: Remember to always double-check your permissions and configurations to avoid any unintended consequences.


